|
<< Click to Display Table of Contents >> Navigating the Tracking Board |
  
|
|
<< Click to Display Table of Contents >> Navigating the Tracking Board |
|
The Tracking Board can be set up to be interactive or non-interactive (read-only).
| • | Interactive Tracking Boards can display a single empty row for rooms that are set up to allow multiple locations (when the room has not reached its maximum capacity). |
| • | Tracking Boards that are set up as read-only can display empty locations, if desired. |
The Tracking Board description will display above the Tracking Board. Any columns with an up/down arrow in the title can be sorted by selecting the arrows. Users can reorder columns and change the column widths, and the system will retain those changes until changed again. This is referred to as "sticky" functionality. The Patient Total for the current Tracking Board will display in the upper-right hand corner of the screen.
Select Charts > Tracking Board
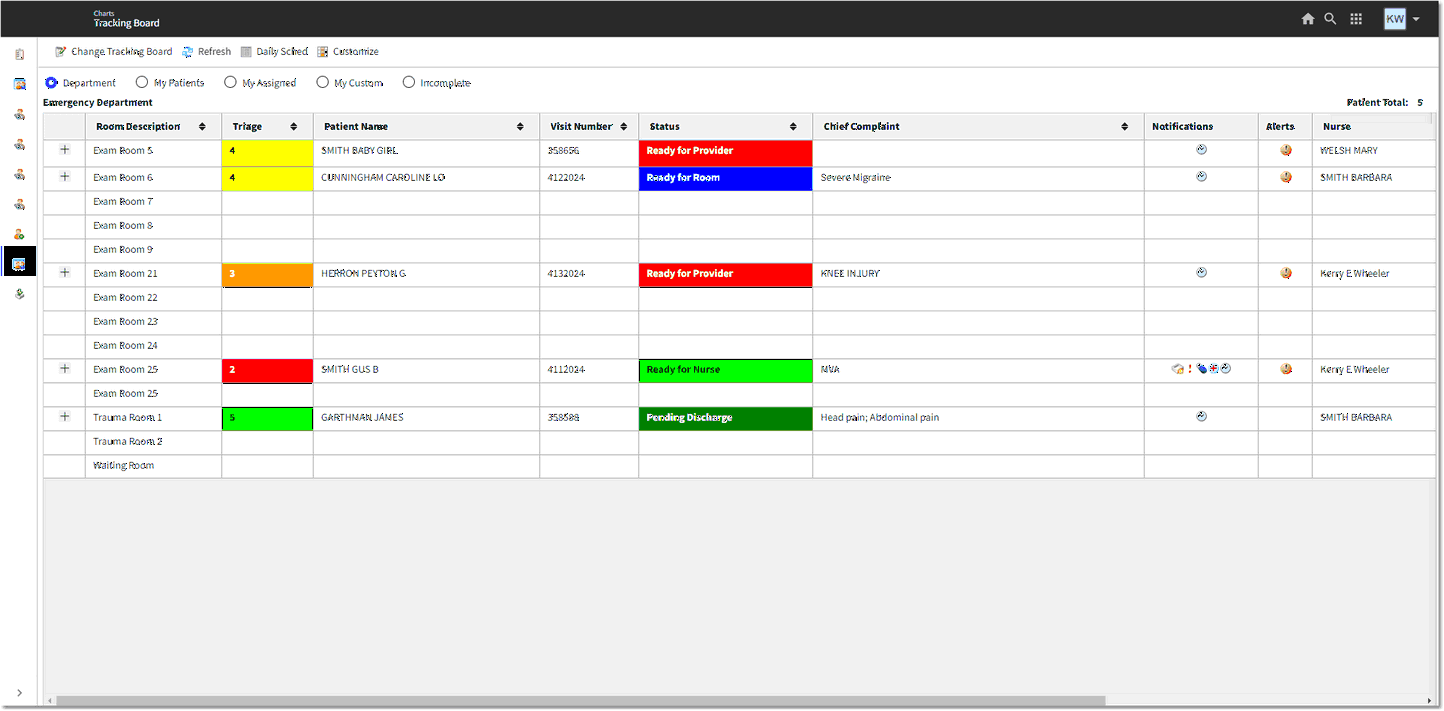
Tracking Board - Emergency Room
Action Bar Options
The following options are available from the action bar:
| • | Change Tracking Board: If other tracking boards are set up for your facility, select this option to display a list of them and choose the one you want to view. |
| • | Refresh: Select to manually refresh the data on the Tracking Board. Once selected, the Refresh option will be grayed out for five seconds. |
| • | Daily Sched: Select to launch the Daily Schedule application for Updated Scheduling. See the Updated Scheduling User Guide for more information. |
| • | Customize: Select to launch the Tracking Board Custom Filter Builder application. Users can select custom filters that have been previously created or create new filters to delimit the Tracking Board in different ways. |
| • | The following options are available from the action bar when a filter has been selected (see Filter Options below): |
| o | Patient Search: Only available when the My Patients filter is selected. Allows the user to search by patient Name or Encounter. |
| o | Clear My Patients: Only available when the My Patients filter is selected. Select to remove all patients from your My Patients list. |
| o | Complete Chart: Only available when the Incomplete filter is selected. Select to complete the chart. |
Filter Options
The following filter options are available:
| • | Department: Displays all patients registered and admitted (Hospital) or registered and checked-in (ED or Clinic) to the department. |
| • | My Patients: Will assume the column setup of the currently selected Tracking Board and will pull patients without regard to which Tracking Board is selected. It displays all patients the user has added to their My Patients list by selecting the green plus sign |
| • | My Assigned: Displays all patients assigned to the user in Patient Location Maintenance (nurse or provider). |
| • | My Custom: Displays patients for the selected custom filters. These filters are created and selected from the Customize option on the action bar. |
NOTE: See Tracking Board Filters for more information on using and/or creating custom filters.
| • | Incomplete: Displays patients from the department (both current and discharged) with Incomplete items on the Discharge Checklist. |
NOTE: See Incomplete Tracking Board for more information on navigating this board.
Tracking Board Display
| • | The rooms assigned to the department are hard-coded to display in the first column. The remainder of the columns on the Tracking Board are user-defined in the Tracking Board setup. |
| o | If a cell from the Room column is selected and has a patient assigned, the system launches to the Patient Location Maintenance area of the patient chart. Patient Location Maintenance is where where the Chief Complaint may be added, a nurse assigned, the location changed, a triage level assigned, or the patient's status changed. |
| o | If a room with no patient assigned is selected, the system allows a patient to be added manually to the Tracking Board (ED only). A Patient Search option is provided to locate an existing profile and create a new visit, select an existing visit, or create a new profile and new visit. See EDIS Temporary Registration for more information. |
NOTE: The patient account must still be fully registered by hospital Registration.
| • | Tracking Board columns may be assigned to launch to a specific Destination (i.e., application on the patient chart). When a Destination is assigned to a column in the Tracking Board setup and the column cell is selected on the Tracking Board, the system will launch to the set Destination on the patient chart. For example, selecting the Patient Name may be set upto launch to the Notes application on the patient's chart. |
| o | The columns listed below are available for use on a Tracking Board, but may not be displayed in the example image. Columns may be sorted (if the up and down arrows are available in the header). Most of this information populates from the Census Registration and ADT screens: |
| ▪ | Medical Record Number |
| ▪ | Date of Birth |
| ▪ | Age |
| ▪ | Gender |
| ▪ | Visit Number |
| ▪ | Full Name |
| ▪ | First Name |
| ▪ | Last Name |
| ▪ | Room Description |
| ▪ | Stay Type |
| ▪ | Admit Date and Admit Date/Time |
| ▪ | Chief Complaint: Populates from the Clinical tab of the Registration and ADT. |
| ▪ | Minutes at Location, Minutes Since Check In, and Minutes at Status: These fields track in minutes that are calculated based on the last location change, check-in time, and the last status assigned to the patient. |
| ▪ | Attending, Provider of Care, Primary Care, and Consulting: The patient's designated providers. |
| ▪ | Check-In Time |
| ▪ | Primary and Secondary Insurance: Guarantor/Insurance information from the Census. |
| ▪ | Authorized Representative: Authorized Representative assigned from the Census. |
| ▪ | Code Status: This column will show the patient's entered Code Status or will default to blank if it has not been addressed. There is an option for a facility to have the Code Status default to Assume Full Code for any patients where the Code Status has not yet been addressed. Code Status options include: Full Code, Do Not Intubate, Do Not Resuscitate, and Medications Only. The Code Status may be addressed via Order Entry by placing a Nursing Order for Code Status and then selecting one of the given options. |
| o | The columns listed below populate from the information entered in the Patient Location Maintenance area of the patient's chart: |
| ▪ | Status: May be color-coded. Upon clicking the Status field on the Tracking Board, a modal will open with the list of statuses for the department listed. Double-clicking the status will automatically update and exit back to the Tracking Board. (See screenshot below.) |
| ▪ | Triage Level: May be color-coded. |
| ▪ | Priority Patient |
| ▪ | Nurse |
| ▪ | Hospitalist |
Select Tracking Board > Status
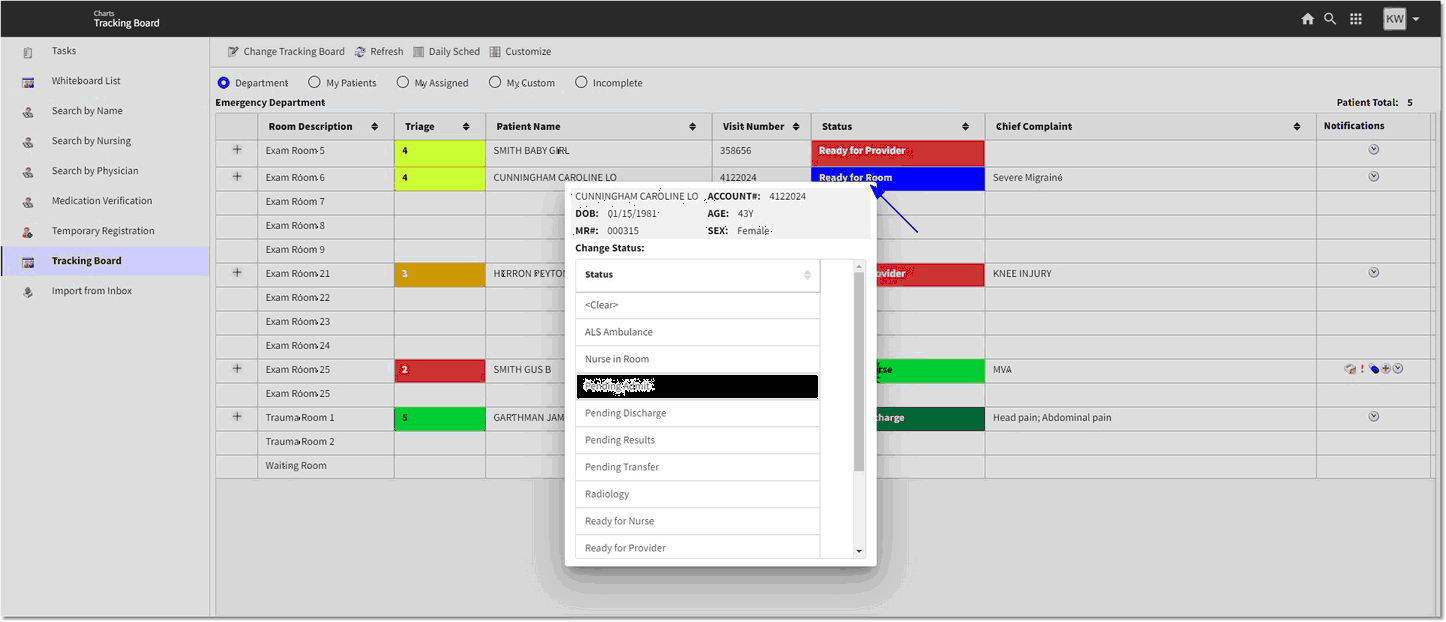
Tracking Board - Change Status
| o | Additional columns will populate based on other areas: |
| ▪ | Alerts |
| ▪ | Comments: Allows users to enter public and/or private notes on patients. Comments are NOT a part of the patient's chart. Anything that needs to be included in the patient's chart should not be added as a comment. |
| ▪ | Notifications: Displays Notification icons when the patient has ancillary orders, nursing orders, undocumented medications, available results, or transcriptions. See Addressing Notifications for more information. |