|
<< Click to Display Table of Contents >> Scheduling Recurring Appointments |
  
|
|
<< Click to Display Table of Contents >> Scheduling Recurring Appointments |
|
To schedule recurring appointments for a patient, place the cursor in the appropriate date and time cell on the grid for when the first appointment should be scheduled and double-click.
Search for a Patient by Date of Birth or Name. Once the name of the desired patient is displayed, double-click on the patient's name.
NOTE: If it is a patient who has never been seen at the facility, select New Profile to proceed.
Select Web Client > Scheduling > Select Date and Time
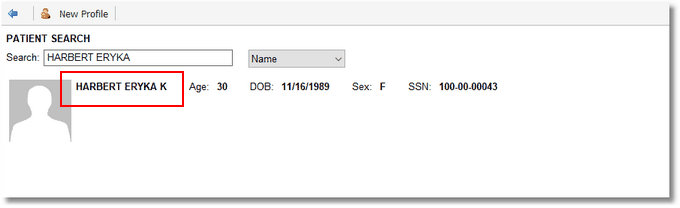
Patient Search
Select the task to be scheduled and then select ![]() Schedule from the action bar.
Schedule from the action bar.
To set up the recurrence pattern, select ![]() Recurring on the action bar.
Recurring on the action bar.
Recurrence Options screen will then display. The recurrence pattern and range of recurrence selections will need to be set up based on how often the patient will need to be seen. Once all recurrence options have been completed, select Update on the action bar.
NOTE: The options for the recurrence pattern will change as Daily, Weekly, Monthly or Yearly is selected.
Select Web Client > Scheduling > Select Date and Time > Select Patient > Select Task > Schedule > Recurring
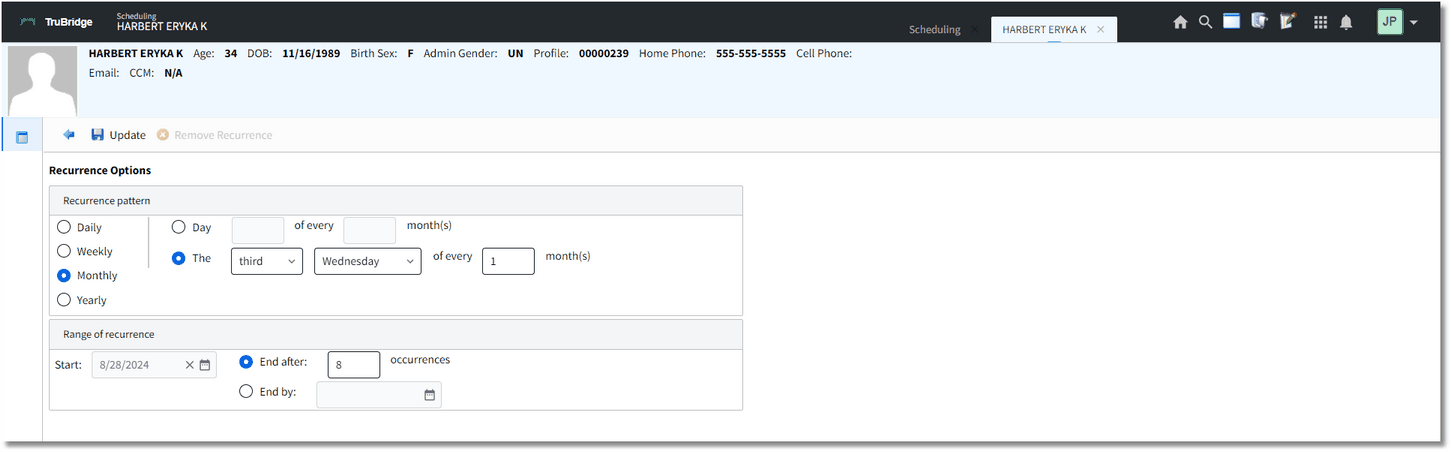
Recurrence Options
TruBridge EHR will return to the Event screen. Fill out the screen and select ![]() Update once finished.
Update once finished.
NOTE: Please refer to the Event Screen section of this user guide for information on how to complete this screen.
TruBridge EHR will then proceed to the Appointment Detail screen and list each appointment that the patient will have, based on what was selected in the Recurrence Options screen.
Select Web Client > Scheduling > Select Date and Time > Select Patient > Select Task > Schedule > Recurring > Update > Update
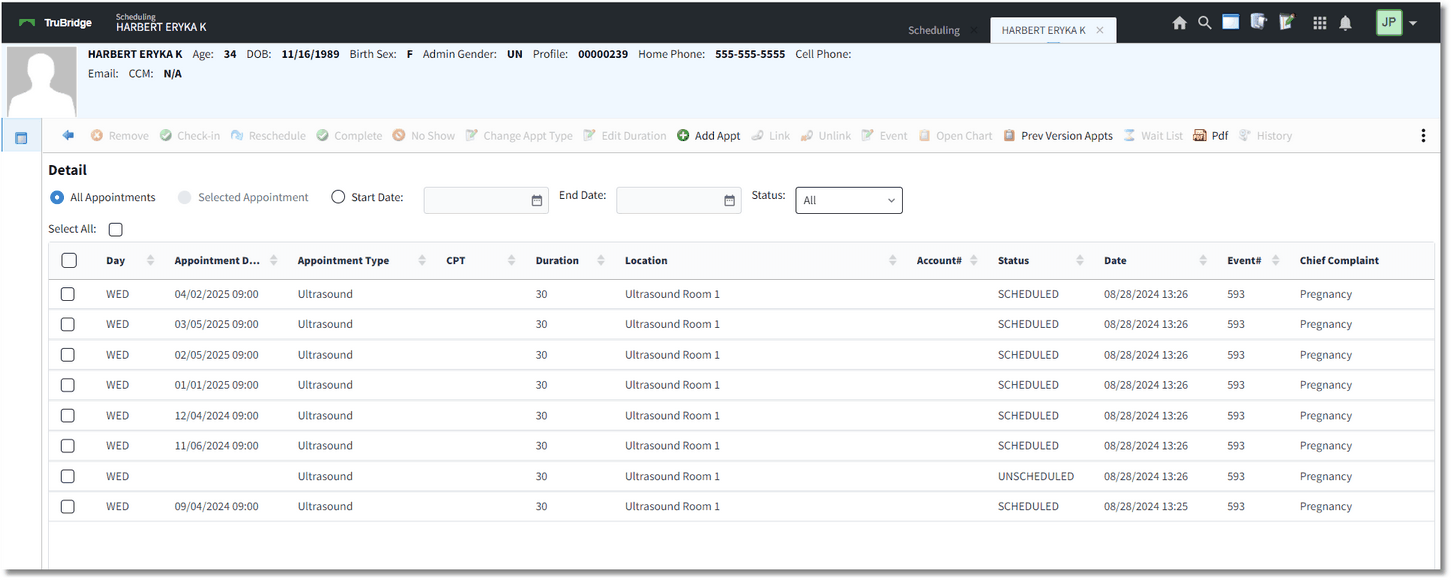
Appointment Detail
If there is a conflict with the scheduling of any appointment, a warning will appear stating "Warning: There is a conflict with scheduling on XX/XX/XXXX XX:XX. Do you wish to schedule anyway?" If Yes is selected, and the user has the Behavior Control's "Override Scheduling Blocks" and "Overbook Appointments" set to allow, then TruBridge EHR will continue to schedule the appointment for the date and time of the conflict. If No is selected, or the user does not have the Behavior Control's "Override Scheduling Blocks" and "Overbook Appointments", the appointment will be listed at a status of "UNSCHEDULED."
Conflicts may occur for any of the following reasons:
•The Patient Profile already has a scheduled appointment for the same date and time as the recurring appointment.
•The Max Per Day and/or Max Simultaneous settings in the Locations and Personnel tables have been exceeded for the selected resource, due to previously scheduled appointments.
•Schedule Blocks and Alternate Closures are on the scheduling grid for the date and time for which the appointment is intended to be scheduled.
Unscheduled Tasks
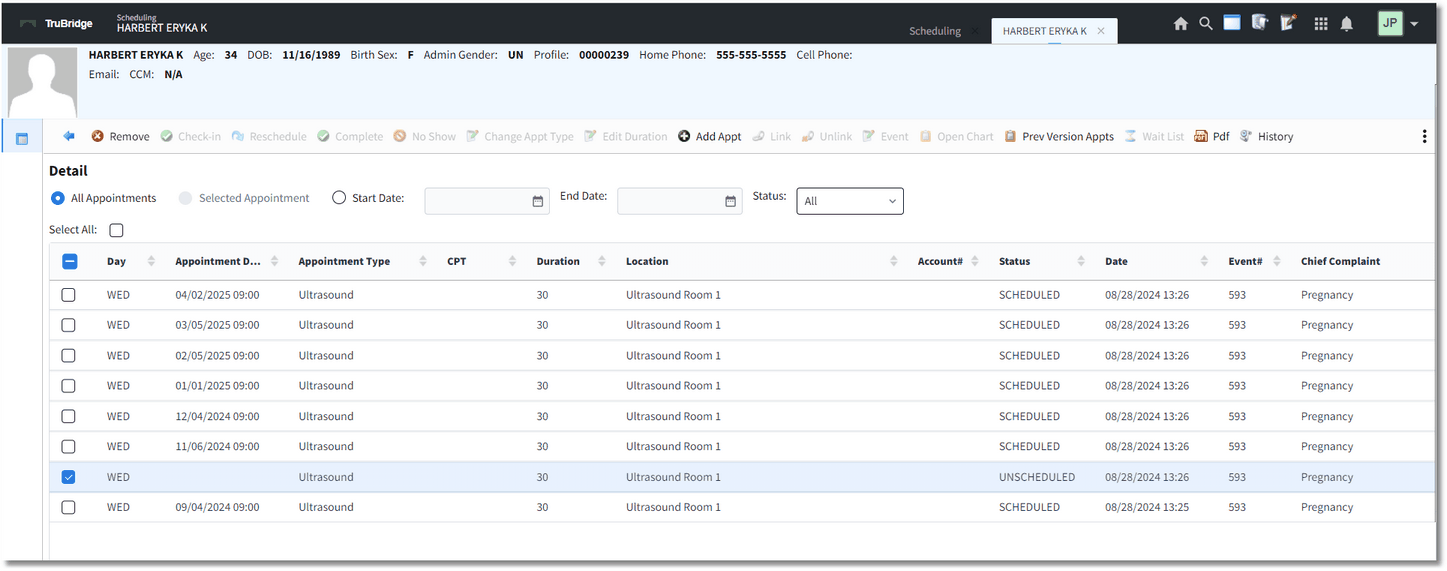
To schedule an appointment that is at the Unscheduled status, double-click it on the Appointment Detail screen.
NOTE: If any Unscheduled appointments cannot be reconciled at this time, the user can do so at a later time by running the Unscheduled Tasks Report. For more information on how to run this report, please refer to the Unscheduled Tasks Report section.
Select Web Client > Scheduling > Select Date and Time > Select Patient > Select Task > Schedule > Recurring > Update > Update
Appointment Detail
TruBridge EHR will then proceed to the scheduling grid for the day or week the appointment should be scheduled. The date and time slot for which the system had attempted to schedule the patient will display in red on the scheduling grid. The resource and date may be changed to look at other availabilities. Once a date and time have been determined, double-click that slot on the scheduling grid and select ![]() Update on the action bar to return to the Appointment Detail screen to view all the recurring appointments. Select the back arrow on the action bar to return to the scheduling grid.
Update on the action bar to return to the Appointment Detail screen to view all the recurring appointments. Select the back arrow on the action bar to return to the scheduling grid.
Changing Status
If the status of a recurring appointment needs to be Rescheduled, Checked-in, Completed, Canceled or marked as a No Show, an additional prompt may display.
When the Reschedule or Cancel option is selected, a prompt will display asking if the status change is for the entire series. If Yes is selected, the Reschedule or Cancel status will be applied to all recurring appointments for the patient. TruBridge EHR will update the scheduling grid. If No is selected, the Reschedule or Cancel status will only be applied to the selected appointment.
If the Check-in, Complete, or No Show option is selected for the appointment, the action will only be applied to the selected appointment.