|
<< Click to Display Table of Contents >> Overview |
  
|
|
<< Click to Display Table of Contents >> Overview |
|
The Event screen is where all the information regarding the appointment is captured. None of the information on the screen is required to be completed, but it is best to capture as much as possible.
Select Web Client > Scheduling > Select Date and Time > Schedule > Select Patient > Select Task > Schedule
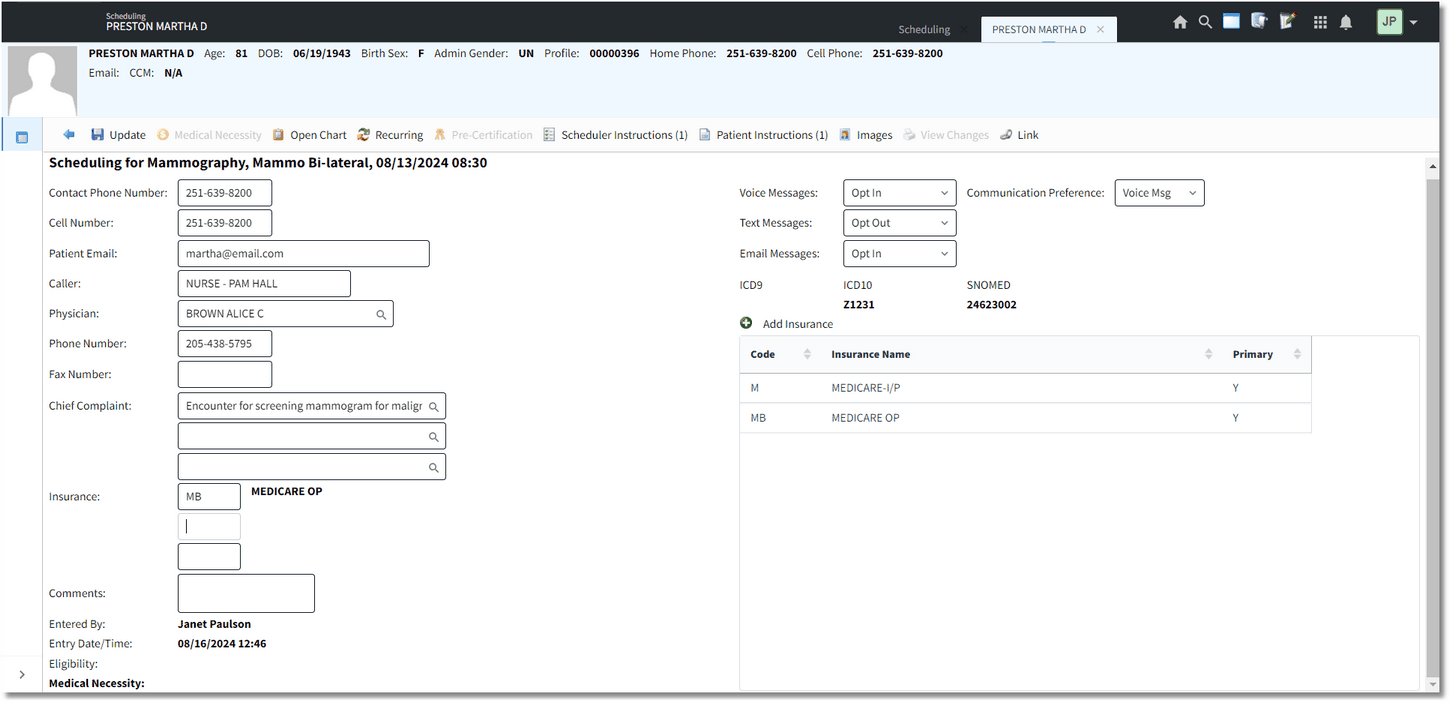
Schedule - Event
The following fields may be completed while scheduling a patient:
•Contact Phone Number: The patient's phone number will automatically pull from the patient profile.
•Voice Messages: Select Opt In or Opt Out from the drop-down to determine if a patient would like to receive voice messages regarding their appointment, to the number in the Contact Phone Number field. This field is utilized by facilities using the Patient Connect application. Facilities that have not purchased Patient Connect may utilize this field for informational purposes.
•Communication Preference: The patient's communication preference will pull from the patient profile. To add or make changes to this field, select the patient's preferred form of communication from the drop-down menu. The options for this field are E-mail, Voice Message or Text Message.
•Cell Number: The patient's cell phone number will automatically pull from the patient profile. This number may be over-keyed if needed.
•Text Messages: Select Opt In or Opt Out from the drop-down to determine if a patient would like to receive text messages regarding their appointment, to the number in the Cell Number field. This field is utilized by facilities using the Patient Connect application. Facilities that have not purchased Patient Connect may utilize this field for informational purposes.
•Patient Email: The patient's email address will automatically pull from the patient profile, if present. This field will only be accessible if the Behavior Control 'Update Patient Email to Profile' is set to allow in Identity Management. If the email address is added or changed from this field, it will automatically update the patient profile as well.
•Email Messages: Select Opt In or Opt Out from the drop-down to determine if a patient would like to receive emails regarding their appointment, to the number in the Patient Email field. This field is utilized by facilities using the Patient Connect application. Facilities that have not purchased Patient Connect may utilize this field for informational purposes.
•Caller: Enter who is making the appointment (Patient, Nurse, Doctor etc.)
•Physician: Use the look-up to select a referring physician for the appointment.
•Phone Number: The physician phone number will automatically populate if loaded in the physician table. This number may be over-keyed if needed.
•Fax Number: The physician fax number will automatically populate if loaded in the physician table. This number may be over-keyed if needed.
•Chief Complaint: Use the look-up to enter up to three chief complaints.
NOTE: For stand alone clinics utilizing TruBridge Provider EHR or a department set up as a clinic utilizing Thrive Provider EHR, free text the reason for the patient's visit in the Chief Complaint fields as opposed to using the look-up.
•Insurance: The patient's insurance(s) may be populated in the three fields provided. The first field is for the primary insurance, the second field is for the secondary insurance and the third is for the tertiary insurance. A list of insurances on the patient's profile will display on the right side of the screen to help determine which financial classes to use as the primary, secondary or tertiary. Select Add Insurance to add a new insurance for the patient. If a new insurance is added, it will also be added to the patient's profile. Double-click on an insurance to view the Policy Information screen to make any changes as needed. If a new insurance is added or changes have been made to the insurance, select Save to retain all information.
Only insurances listed on the right-side of the screen may be entered in the Insurance fields. The only exception will be is if the patient is Private Pay. For Private Pay patients, enter a P in the primary insurance field.
NOTE: Insurances may only be added or edited from this screen. If an insurance needs to be removed, this must be done from the patient profile.
NOTE: If visits are being auto created, the insurances listed in these fields will be used to create the claims on the account when the visit is created.
•Comments: A comment may be entered.
Select ![]() Update to save any information that was entered and to return to the scheduling grid. The Entered By field will then populate with the users name of whom created the event as well as the entry date and time.
Update to save any information that was entered and to return to the scheduling grid. The Entered By field will then populate with the users name of whom created the event as well as the entry date and time.