|
<< Click to Display Table of Contents >> Personnel |
  
|
|
<< Click to Display Table of Contents >> Personnel |
|
All staff members who may perform tasks/procedures will need to be set up in the personnel table. This table is where the available hours are set as well as when personnel will not be available.
There are options at the top of the screen that will allow the list to be delimited by Active Only, Inactive Only or Both. A search option is also available.
Select Web Client > Tables > Patient Intake > Personnel
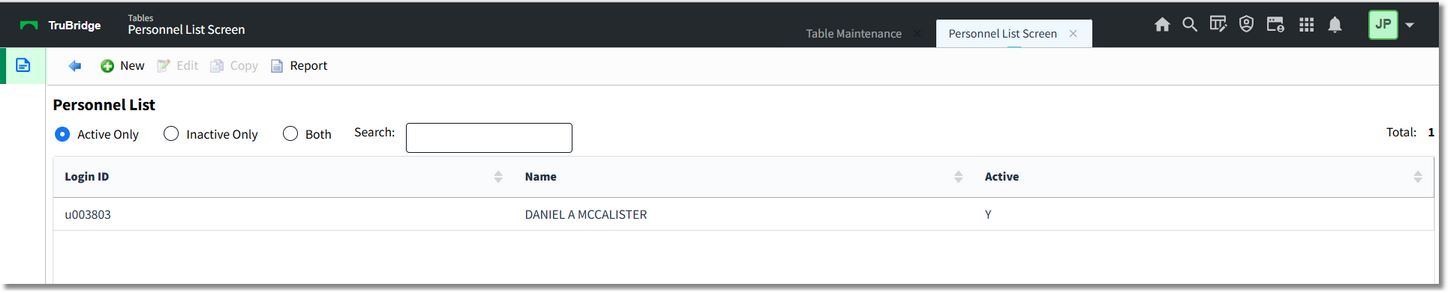
Table Maintenance - Personnel
Below is an explanation of each column:
•Login ID: The employee's logname that is used to log in to TruBridge EHR
•Name: This column displays the name of the employee who is affiliated with the logname to the left.
•Active: The column displays a Y if the person is actively being used, or an N if the person is marked as inactive.
Action Bar options:
•New: Selecting this option will allow a new personnel record to be created.
•Edit: Selecting this option will allow the information for the personnel record to be changed.
•Copy: Selecting this option will allow personnel information to be copied to a new personnel record.
NOTE: When creating a new personnel record through the Copy option, give the new entry a name first and then save the new entry. If further table maintenance is required, the new personnel record should be accessed from the Personnel List.
•Report: Selecting this option enables information from the Personnel table to be exported into a report. After selecting Report, the Report Writer Parameters screen will appear, allowing filters to be applied as needed. Once all are set, select Run Report to generate the file.
NOTE: This report is also available within the Report Dashboard and it titled "Scheduling Personnel Table Setup".
Personnel Edit
Select Web Client > Tables > Patient Intake > Personnel > Select Personnel > Edit
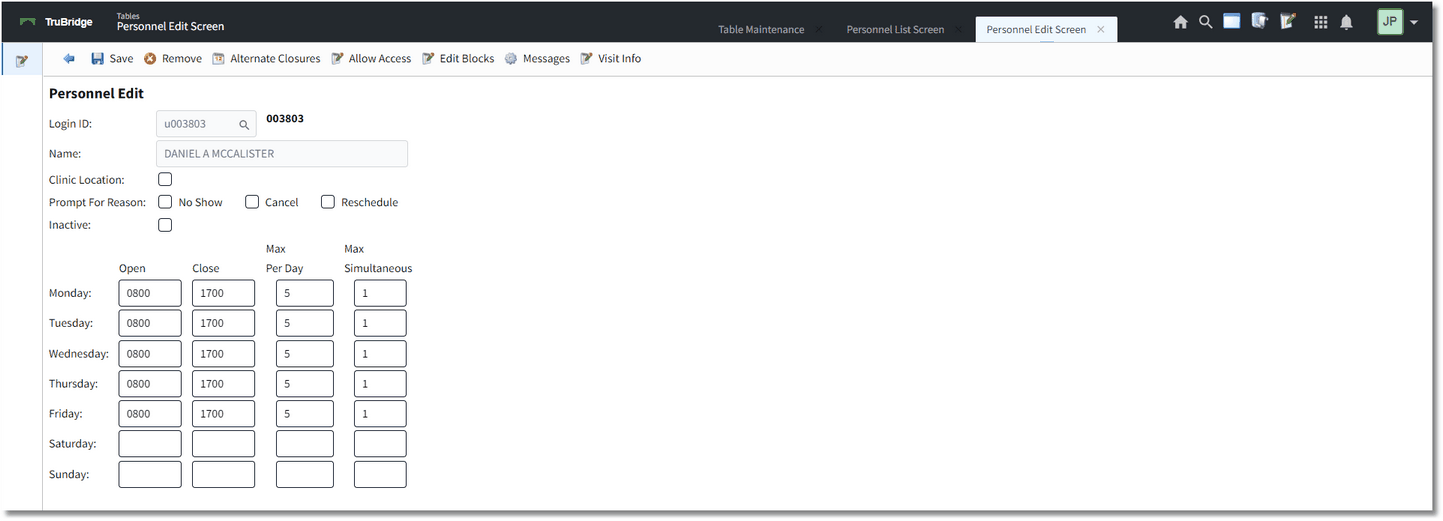
Table Maintenance - Personnel
Below is an explanation of each field:
•Login ID: This is the logname associated with the employee. A search option is available if the logname or "login ID" is not known.
•Name: This is the name of the person who is affiliated with that particular logname or "login ID." Once a login ID is entered, the name will automatically be populated.
•Clinic Location: Select this option if personnel will be in a clinic location.
•Prompt for Reason: Select the following options to prompt for a Reason when an appointment status is changed to No Show, Cancel or Reschedule for this Personnel.
•Inactive: Select this option if the person will no longer be used. This will omit the person from any look-ups during scheduling.
•Availability: This section will determine when the employee will be available to schedule patients. This will reflect on the scheduling grid.
•Open: This is the time the employee will be available for the day. The time must be entered in military time.
•Close: This is the time the employee will no longer be available for the day. The time must be entered in military time.
•Max Per Day: The maximum number of patients that may be scheduled for the day.
•Max Simultaneous: The maximum number of patients that may be scheduled at the same time. If the number of patients are exceeded, a warning will appear as soon as the time slot is selected during scheduling.
If two schedulers are scheduling at the same time and scheduler A selects a time slot to schedule the last patient before Max Simultaneous has been reached, then scheduler B selects the same time slot, a warning will appear. The warning will let scheduler B know that the selected time slot has been locked by scheduler A and that the Max Simultaneous has been reached.
NOTE: The Behavior Control "Override Appointments" may be set to allow for a user to override/overbook time slots that have been maxed out.
Action Bar options:
•Save: Select this option to save any changes if a new personnel record is created or if changes are made to an existing personnel record.
•Remove: Select this option to delete a personnel record.
•Alternate Closures: This option is selected if the user needs to set up specific days/times that the employee will be unavailable. This will be reflected on the schedule.
•Allow Access: This option is selected if needing to allow specific users access to view personnel on the scheduling grid, Print Schedule and Daily Schedule. See below for more information on how to add users on the Allow Access screen.
NOTE: In order for the Allow Access option to function as described, "Limit Resource Access" must be selected in the General Control table. See General Control for more information.
•Edit Blocks: Select this option to create a task block for this person. Creating a task block from this table will allow multiple resources to be added. See below for more information on how to create a task block.
•Messages: Select this option to configure an Affirmation, Confirmation or Reminder message to the patient when scheduling for this personnel. Refer to the Messages section for additional information on this option.
•Visit Info: This option is selected if wanting to auto create visits during the scheduling process. In order to use the functionality, Auto Create Visits will also need to be selected in the General Control table.
Schedule Personnel Alternate Closures
Below is an explanation of the columns:
•Frequency: This will show how frequently the closure will occur.
•Recurrence: Number of recurrences set up for the closure
•Range Start: The date the closure will start
•Range End: The date the closure will end
•Start Time: The time the closure will start
•End Time: The time the closure will end
Action Bar options:
•New: Select this option to set up a new alternate closure.
•Edit: Select this option to make changes to an existing closure.
Recurrence Options
Below is an explanation of each field:
•Recurrence Pattern: This section will determine how often the alternate closure will recur as well as what days it will recur.
•One Time: Select this option if the closure will only happen one time. An example of when this would be used is if a doctor has vacation planned.
•Daily: Select this option if the closure will occur on a daily basis. Once selected, choose how often the closure will recur. An example of when this would be used is if the employee will not be available for lunch everyday.
•Every __ days (s): Select this option to populate the number of days the closure will recur.
•Every weekday: Select this option if the closure will recur Monday thru Friday.
•Weekly: Select this option if the closure will occur on certain days of the week. Once selected, choose when the closure will recur and on which days of the week. An example of when this would be used is if the personnel is not available on Mondays, Wednesdays and Fridays.
•Recur every __ week(s) on: Populate the number of weeks the closure will recur and then select the days of the week the closure will recur on.
•Monthly: Select this option if the closure will occur on a certain day of the month. Once selected, choose how often the closure will recur. An example of when this would be used is if the personnel is not available the last Friday of every month.
•Day __ of every __ month(s): Select this option and populate the date of the month and how many months the closure will recur.
•The __ __ of every __ month(s): Select this option to designate if the closure will happen on the first, second, third or fourth day of a month, followed by how many months the closure will recur.
•Yearly: Select this option if the closure will occur on a certain day every year. Once selected, choose what day of the year the closure will recur on. An example of when this would be used is if the employee will not be available on holidays such as Thanksgiving or Christmas.
•Every __ __: Select this option to select the month and day of the closure.
•The __ __ of __: Select this option if the closure will happen the first, second, third, fourth or last day of a month.
•Range of Recurrence: After the Recurrence Pattern is set up, the Range of Recurrence will need to be set up to determine when to start the closure. If the recurrence is only for a certain amount of time, information may be entered to state when it will end.
•Start: The date the closure will start
•Time: The time the closure will start
•No end date: Select this option if the closure will never end.
•End After __ Occurrences: Select this option if the closure will stop after a certain number of occurrences. If selected enter in the number of occurrences.
•End by: Time: Select this time if the closure will stop on a certain date and time.
NOTE: If a closure is being set up and has no end date, but should end at a certain time every day, select No end date and enter in the end time only in the End by field, leaving the date blank.
Action Bar options:
•Save: Save any changes made to the alternate closure.
•Remove Recurrence: Remove the alternate closure from the personnel record.
Allow Access
The Allow Access option will allow users to be added who need access to view the personnel on the scheduling grid, Wait List, Print Schedule and Daily Schedule. If no users have been added to the Allow Access screen, the personnel will be viewable for all users. Once a user is added to the Allow Access screen, the personnel will only be visible to the listed user(s).
Below is an explanation of the columns:
•Login ID: The login ID of the user with allow access for the location.
•Name: The name associated with the login ID.
•Disabled Date: The date the login ID was disabled in Identity Management. If this column is blank, the user is still active in TruBridge EHR.
Action Bar Options:
•Add: Select this option to add logins to the Allow Access screen.
•Remove: Select this option to remove logins from the Allow Access screen.
The Add option for the Allow Access screen will allow employees to be searched and added. Employees may be searched by Name or by Logname. Select the drop-down next to the Search field to select a search option for the employee(s). The following options on the action bar will become available as employees are selected.
•Save Pending: This option will become enabled once an employee has been added to the Pending Employees column. Select this option to save all employees in the Pending Employees column.
•Move to Pending: This option will become enabled once an employee is selected from the Search Employees column. Select this option to move the employee to the Pending Employees column.
•Remove from Pending: This option will become enabled once an employee is selected from the Pending Employees column. Select this option to remove the employee from the Pending Employees column.
•Clear Pending: This option will become enabled once an employee is in the Pending Employees column. Select this option to remove all employees displaying in the Pending Employees column.
Edit Blocks
The Edit Blocks option will first display any existing blocks that have been setup for the selected location within the selected date range. The blocks list may be delimited by reason or date range at the top of the screen.
Below is an explanation of the columns:
•Reason: The reason for the block. This will display either Block, Other or Close.
•Date: The date of the block.
•Description: The description used for the block.
Action Bar Options:
•Add: Select this option to add a block to the Block List. See below for more information on how to add a task block.
•Edit: Select this option to edit an existing block.
Add Block
Adding a block from the personnel table will allow additional resources to be added so that the block will display on all schedules for those resources. When creating a new block, the ![]() Add Resource option will become enabled once
Add Resource option will become enabled once ![]() Update is selected from the action bar.
Update is selected from the action bar.
NOTE: Additional resources may only be added to a block from the Locations and Personnel tables.
Once on the Resource Selection screen, select the plus sign next to the resource that needs to be added to move it to the Pending Resources column. The Search Resources column may be delimited by using the Type and Search options at the top of the screen.
The following options are available on the action bar.
•Save Pending: Select this option to save all resources in the Pending Resources column.
•Clear Pending: Select this option to remove all resources displaying in the Pending Resources column.
•Remove from Pending: Select this option to remove resources from the Pending Resources column.
Once all resources have been selected, select ![]() Save Pending on the action bar. TruBridge EHR will then return to the Block screen.
Save Pending on the action bar. TruBridge EHR will then return to the Block screen.
Select Update to save all selections.
If a resource needs to be removed, select the resource from the Additional Resources section and then select ![]() Remove Resource from the action bar.
Remove Resource from the action bar.
If ![]() Remove Block is selected on the action bar, a message will display stating that the block will be removed from all current and future occurrences for all resources listed.
Remove Block is selected on the action bar, a message will display stating that the block will be removed from all current and future occurrences for all resources listed.
Messages
The Messages option is where messages may be customized for a specific location where patient's are scheduled.
NOTE: Access will need to be given to the Message Configuration Behavior Control to have access to this screen.
Select which message to customize and then select Edit.
The Appointment Message for the selected location will display. The message may only be activated/deactivated and the message content customized.
Visit Info
The ![]() Visit Info option will determine if a visit needs to be created for the personnel during the scheduling process. To allow a visit to be created, select the Create Visit field.
Visit Info option will determine if a visit needs to be created for the personnel during the scheduling process. To allow a visit to be created, select the Create Visit field.
Additional fields will display once Create Visit is selected. Define the Stay Type to be used when creating the visit. The Subtype, Service Code, Physician and Admit Code are optional fields that may be defined as well. Select ![]() Save once all fields have been addressed.
Save once all fields have been addressed.
NOTE: If the personnel is a clinic location, the Admit Code display in red and will automatically populate from the MPEMR Practice Information table and cannot be changed from this screen. If changes need to be made to the Admit Code, it will need to be changed in the MPEMR Practice Information table.