|
<< Click to Display Table of Contents >> Implantable Devices |
  
|
|
<< Click to Display Table of Contents >> Implantable Devices |
|
Implantable Devices history allows any Unique Device Identifiers (UDI) to be documented within a patient's electronic health record. The information may be entered at the time of implementation by scanning the UDI barcode or manually keying the UDI number. Once entered, the system will query the database and automatically load all the available information about the UDI. The information may also be entered from a previous implantation. An audit log is available for all records and any subsequent changes to those records.
To view Implantable Device History, go to Patient Chart > Health History and see the entries under the Implantable Devices heading. (TIP: Choose List View if you want to edit items in the list.)
This section covers the following topics:
1.Go to Health History > New. The Health History Categories page is displayed.
2.Double-click Implantable Devices from the list of Health History categories. The Device Edit screen is displayed.
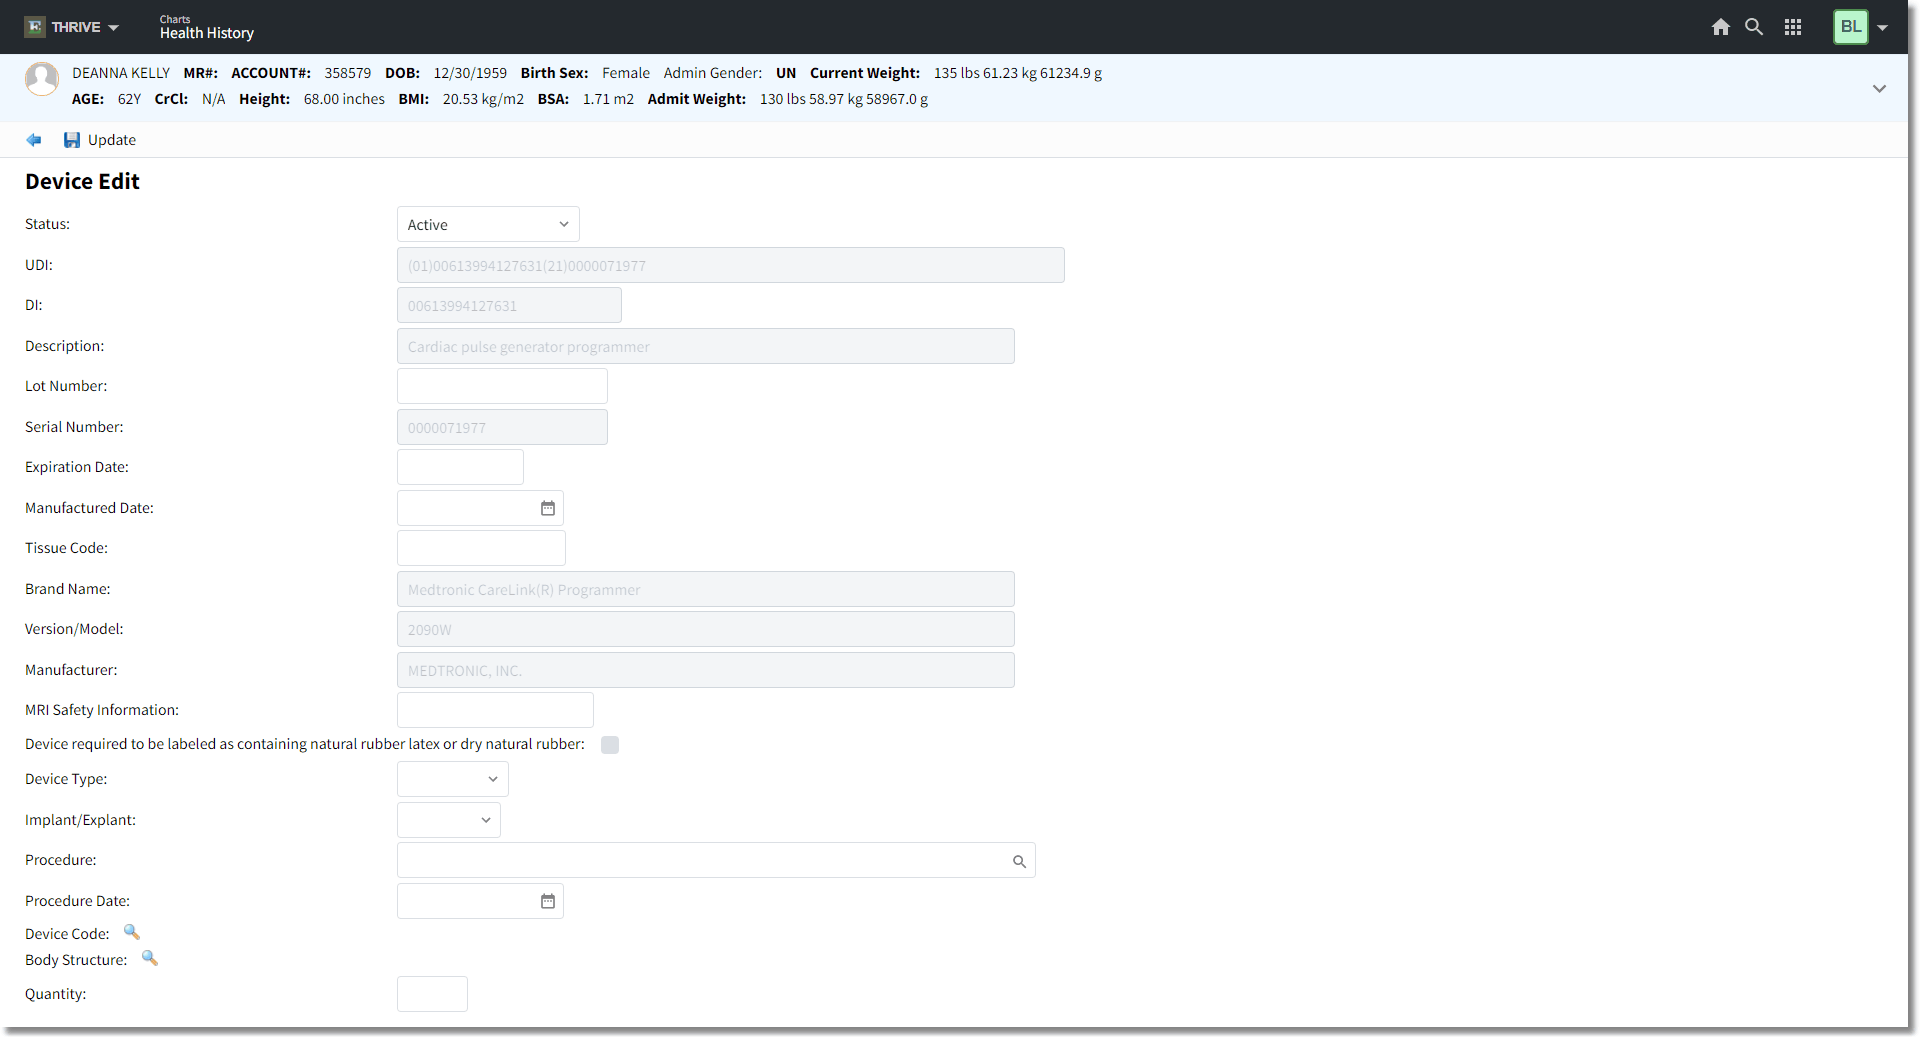
Device Edit
2.In the UDI field, any GSI, HIBCC, and ICCBBA issuing device bar code may be scanned. Scan the bar code and press <Tab>, or enter the UDI and press <Tab>. Pressing <Tab> initiates the query to the database. Any fields populated by the database query will no longer be editable. If the UDI is not found, the system will populate the fields that are provided by the bar code. If there is no response from the query, the system will prompt, "No Connection to the GUDID database. Please contact Support." If the search returns no results based on the UDI query, the system will prompt, "No matching devices found."
3.Complete the following fields, if not populated:
•Status: When a new UDI is entered, it will default to Active. The drop-down allows a previously entered UDI to be edited to Inactive or Entered in Error. They may be filtered from the Health History Review by Active, Inactive/Removed, or All.
•UDI: The FDA is establishing and requiring a unique device identification system to adequately identify medical devices through their distribution and use. The label of most devices will include a unique device identifier (UDI) in human and machine readable form. The UDI must contain the Device Identifier (DI) and Product Identifiers (PI). Device labelers must submit certain information about each device to FDA’s Global Unique Device Identification Database (GUDID). Once a UDI is entered, TruBridge will query the GUDID and the attached information will automatically populate. These fields will not be accessible for editing once populated.
•DI: The Device Identifier is a number specific to the version or model of the device. This is the primary lookup for a device type.
•Description: The description is a Global Medical Device Nomenclature (GMDN), which is a generic name used to identify medical device products. This description is used to exchange medical device information and support patient safety.
•Lot Number: The lot or batch number within which a device was manufactured.
•Serial Number: The serial number of a specific device.
•Expiration Date: The expiration date of a specific device.
•Manufactured Date: The date the specific device was manufactured.
•Tissue Code: The distinct identification code indicates the product contains or consists of human cells or tissues (HCT/P's) that are intended for implantation, transplantation, infusion, or transfer into a human recipient and the Donation Identification Number. This will on be available on HCT/P implants.
•Brand Name: The proprietary, trade, or brand name of the medical device as used in device labeling or in the catalog.
•Version/Model: The version or model found of the device label or accompanying packaging used to identify a category or design of a device.
•Manufacturer: The manufacturer name of the specific device.
•MRI Safety Information: Indicates the MRI Safety Information, which include MR Safe, MR Unsafe, or MR Conditional.
•Device required to be labeled as containing natural rubber latex or dry natural rubber: The selected check box will indicate a caution that the device or packaging contains rubber or latex that may cause allergic reaction.
•Device Type: The field defaults to Implant, but a drop-down is available to define Implant, Graft, or Hardware. This field is not automatically populated.
•Implant/Explant: The field defaults to Implant, but a drop-down is available to define if the device is being implanted (Implant) or removed (Explant). This field is not automatically populated.
•Procedure: The magnifying glass is available to access the Surgical/Procedural History Review screen. If the procedure is already documented, the user may select the entry to populate the field. If a new entry is created, it will populate the Surgical/Procedure History and Interventions. This field is not automatically populated.
•Procedure Date: The procedure date will auto populate if entered in Surgical/Procedure History and Interventions during documentation or may be manually entered.
•Device Code: The magnifying glass is available to search a listing of Device Codes with SNOMED Codes. The search may be done by SNOMED Code or Description. This field is not automatically populated.
•Body Structure: The magnifying glass is available to search a listing of Body Structures. The search may be done by SNOMED Code or Description. This field is not automatically populated.
•Quantity: This field may be used to document if multiple devices are implanted. This field is not automatically populated.
4.Click Update to save.
5.Click the blue back arrow to return to Health History Review in either Narrative View or List View. The Implantable Device displays with the device description, Status, UDI, DI, manufacturer information, procedure information, and other pertinent information in the List View.
To edit a Family Health History item, go to the Health History Review screen and select List View format. Double-click the item to display the Device Edit screen (or, highlight the desired implant and select Edit). Make edits as needed. Click Update to save the changes.