|
<< Click to Display Table of Contents >> Addressing Notifications |
  
|
|
<< Click to Display Table of Contents >> Addressing Notifications |
|
Tasks screen Alert notifications that are filtered for a folder will display in the right hand column once the folder has been selected. The Tasks screen will auto-refresh for real time updates of the notifications the user has subscribed to receive.
•The following task types will display the Patient Name, Patient Number, Date/Time, and a description of the alert/task:
oDiscrete Lab Results
oAbnormal Lab Results
oPOCNotes
oTranscription
oPatnotes
oSummarized Lab Results
oScanned Image*
NOTE: Scanned images with an Alternate Image title will display on the Tasks screen alert with that Alternate Image title in place of "New scanned Image available," with the intent to reduce alert fatigue. For example, physicians may address the image alerts pertinent to patient care or clinical decision making and then simply acknowledge all others that don't pertain to them, such as drivers licenses, insurance cards, and other documents pertinent to other areas of billing and record keeping.
(See the Task Type chapter for definitions of these task types.)
See examples of several Task screen alerts displayed below.
Select Charts > Tasks > Select Alert/Task

Scanned Image
Selection of the single lab will change the action bar button to Address Selected or the user may double-click the notification to go directly to that document. The alert below is related to abnormal lab results. The lab report will display in common result format and will allow acknowledgment of those results. The user may Acknowledge to clear the alert, select Open Chart to launch the patient's full chart, or select Note to send a note based on that alert. Certain options are available for the PDF within the alert window, such as zooming in/out, downloading, or printing the document.
Select Charts > Tasks > Select Alert/Task
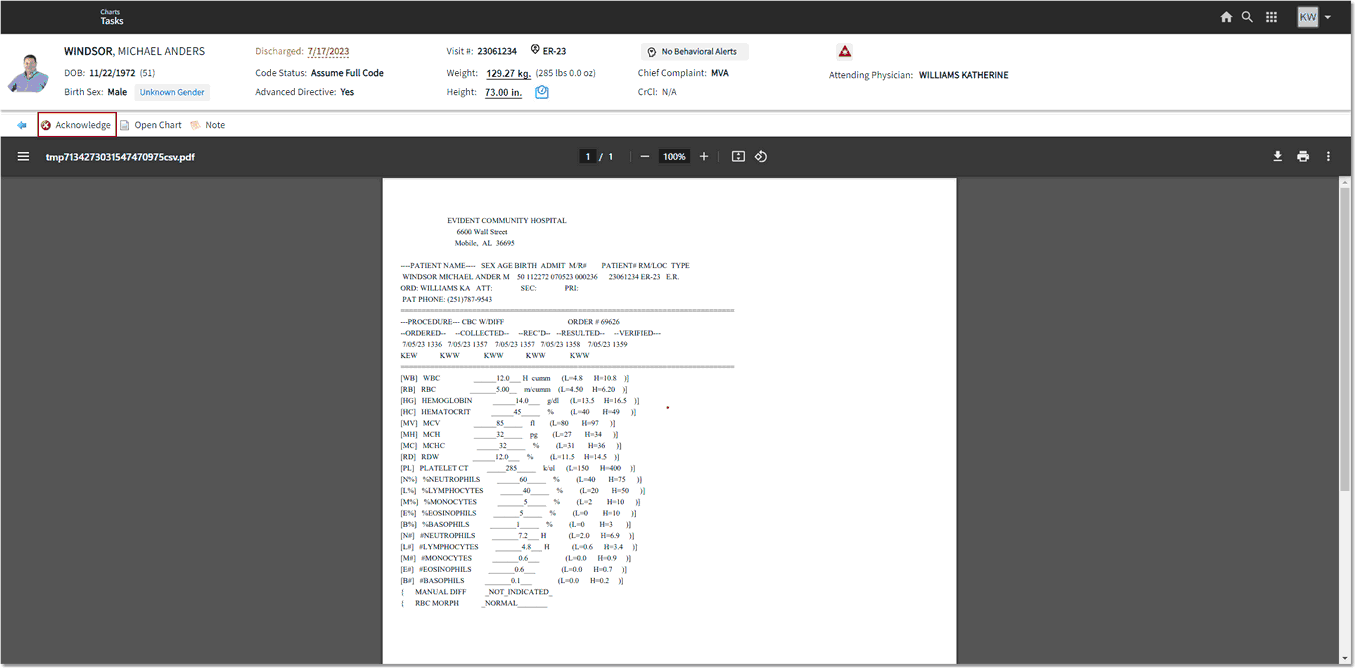
Abnormal Lab
•The Pending Orders alert displays the Patient Name and a notification that there are unprocessed orders within the Order Entry application.

Pending Orders Alert
•The Chart Communication alert displays the type of communication (Message or Request), author, Date/Time of communication entry, Patient Name, and Subject. The communication may be addressed from the alert screen. The Chart Communication alert displays Chart Communication Type, Communication From, Date/Time of communication entry, Patient Name, and Subject.

Chart Communication Alert
Alerts/Tasks may be addressed en masse by folder by selecting Address All from the action bar. Each alert will then display in series, one after another, until all selected have been addressed. The functionality within each notification displayed is the same as described in the above individually selected process. Address All will display as Address Selected if multiple alerts/tasks are selected in conjunction with the Ctrl or Shift keys on the keyboard.
Select Charts > Tasks > select Message
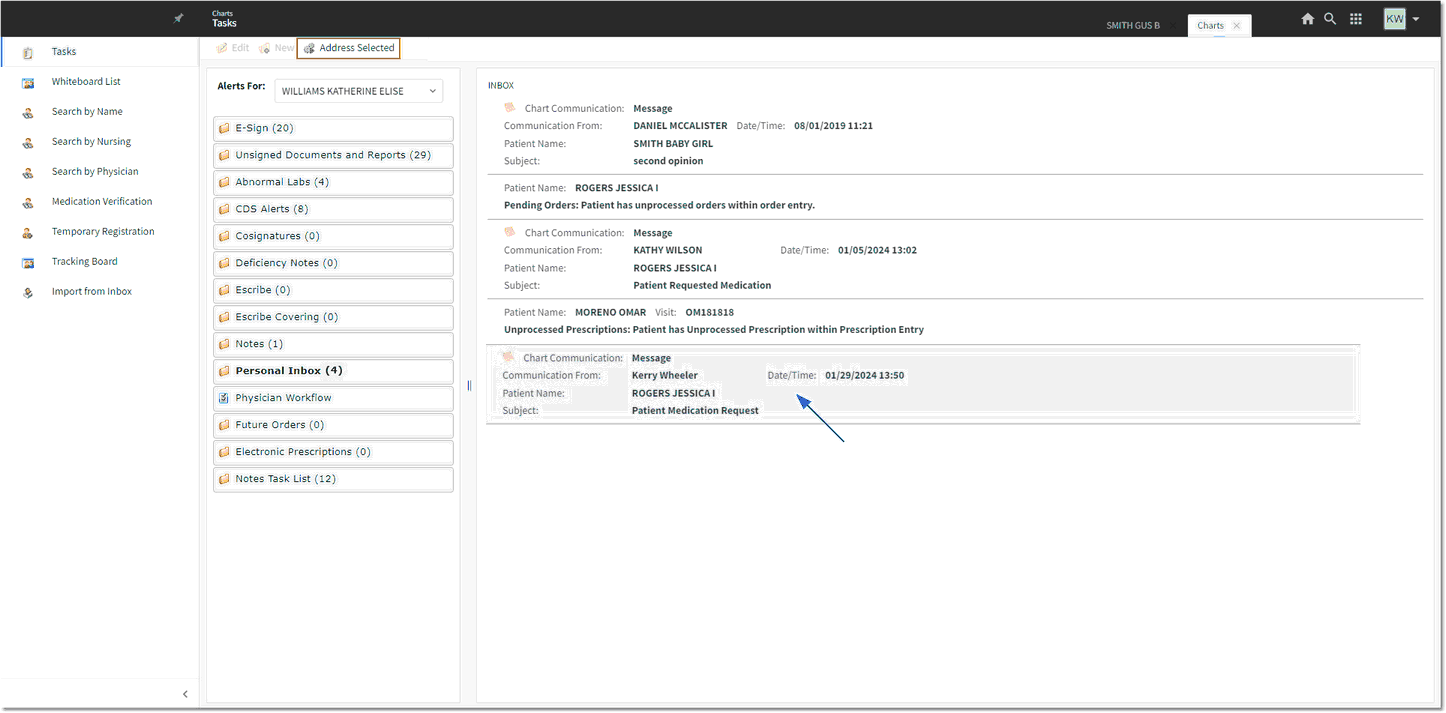
Tasks screen Address All
Multiple options are present on the action bar, but Acknowledge will clear the notification. The user would likely choose to Reply to the Chart Communication and respond to the original sender.
Select Charts > Tasks > select Message > Message Detail
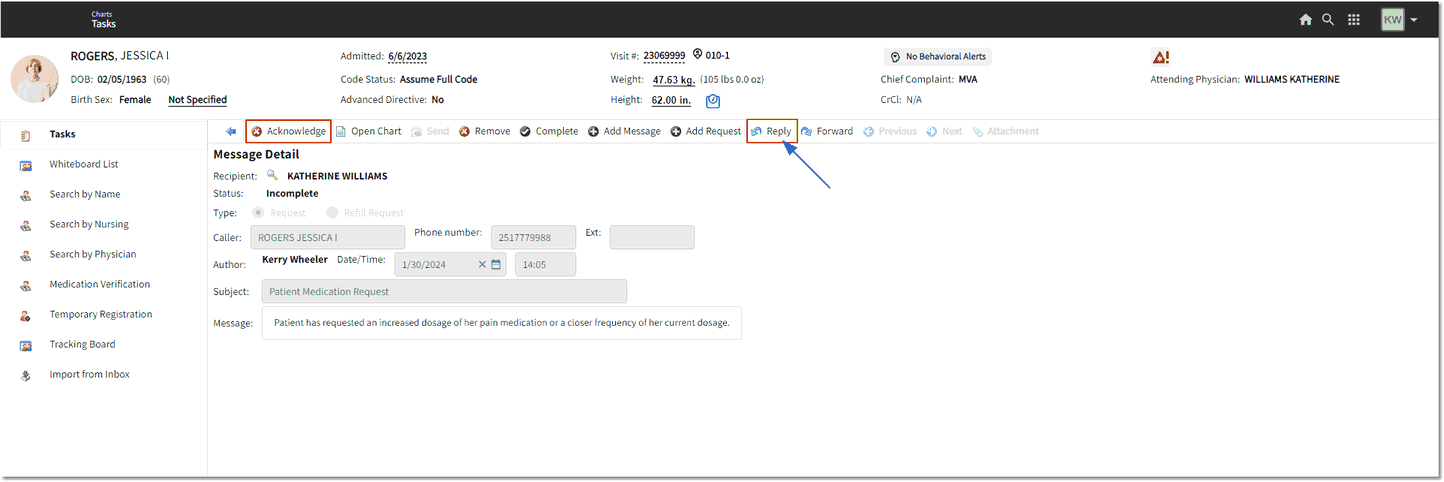
Message Detail
The Message Detail screen displays the Recipient, Status, Type (message, Request or Refill Request), Caller, Phone Number, Ext., Author, Date/Time, Subject, and Message. A Message will not include a Caller or Phone Number.
From the action bar, the following options are available:
•Acknowledge: Once a message or request is acknowledged, the alert will be removed from the Tasks screen alerts. If the message or request was sent as a Department Communication, it will be removed from every user's Tasks screen alert when acknowledged.
•Open Chart: Opens the patient chart.
•Send: The request or message will be sent to the selected recipient and notification will be received on their Tasks screen as an alert.
•Remove: Allows a message/request, or series of messages/requests, to be be flagged as inactive. This will remove the communication from the Tasks screen alerts for all recipients and the Alerts on the Tracking Board. This is a toggle switch, so once a message is removed and saved, the option changes to Make Active. Either of these actions creates a new request or message entry for documentation.
•Complete: Allows a message/request or series of messages/requests to be documented as complete. This is a toggle switch, so once a message is completed and saved, the option changes to Incomplete. Either of these actions creates a new request or message entry for documentation.
•Add Message: Allows a message to be added to a previously saved message from the Message Detail Screen. A Recipient needs to be selected. The Author will populate with the current user's name. The date and time will default to the current date and time, but may be edited. The subject will pull from the prior message, but is editable until saved. The message will be blank for entry. Once saved, the previous message will be removed from Tasks screen alerts for all recipients and the Alerts on the Tracking Board.
•Add Request: Allows a request to be added to a previously saved request from the Request Detail Screen. A Recipient needs to be selected. The Caller will pull the caller from the series. The Author will populate with the current user's name. The date and time will default to the current date and time, but may be edited. The subject will pull from the prior request, but is editable until saved. The request will be blank for entry. Once saved, the previous request will be removed from Tasks screen alerts for all recipients and the Alerts on the Tracking Board.
•Reply: Allows a response to be added to a message or request. The Recipient will be the prior Author. The Type, Caller, and Phone number will pull when the communication is a Request. The Author will populate with the current user name. The date and time will default to the current date and time, but may be edited. The Subject will pull from the previous entry and is editable. The new message may be entered above the previous messages in the communication. Once saved, the previous request will be removed from Tasks screen alerts for all recipients and the alerts on the Tracking Board.
•Forward: Allows a message or request to be sent to another recipient. A Recipient needs to be selected. The Type, Caller, and Phone number will pull when the communication is a Request. The Author will populate with the current user's name. The date and time will default to the current date and time, but may be edited. The subject will pull from the prior message, but is editable until saved. The new message may be entered above the previous messages in the communication. Once saved, the previous request will be removed from Tasks screen alerts for all recipients and the alerts on the Tracking Board.
•Previous: Displays the prior message or request in the series. If on the first message or request, the option is not active.
•Next: Displays the next message or request in the series. If on the last message or request, the option is not active.
•Attachment: When there is an attachment on the communication, this option is active and will display the attachment when selected.
Select Charts > Tasks > select Message > Message Detail
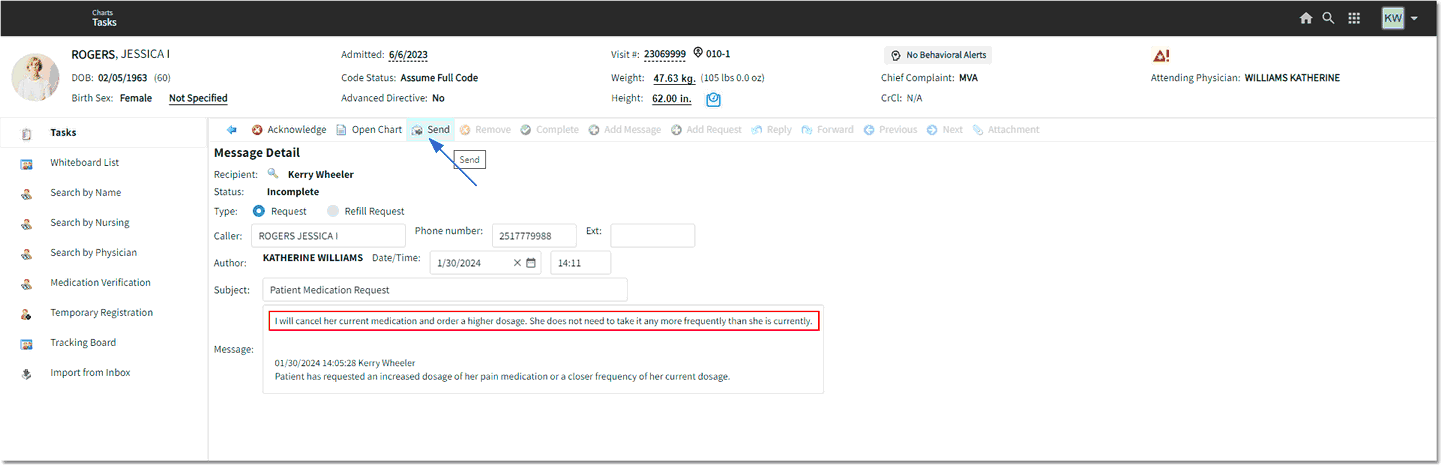
Message Detail
ESignView Notification
If the applicable folder is on the user screen, Alerts/Tasks that require ESign in the ESignView folder may be addressed en masse by selecting Review All from the action bar, which will allow users to view the associated documents/images/orders before esigning with the option to sign. Review All will not display in any other folder. Each alert will then display in series one after another until all selected have been addressed.
1.Upon reviewing a document/image/order, select Sign on the action bar to progress to the Enter Passphrase screen.
2.Enter the ESign passphrase and select Accept to sign the document/image/order.
The user will then be taken to the next document/image/order to be addressed.
Review All will display as Review Selected if multiple alerts/tasks are selected in conjunction with the Ctrl or Shift keys on the keyboard.