|
<< Click to Display Table of Contents >> Scheduling Block |
  
|
|
<< Click to Display Table of Contents >> Scheduling Block |
|
To begin the schedule block process, first select a time slot from the scheduling grid and then select ![]() Block from the action bar.
Block from the action bar.
NOTE: In order to have access to the Block option, the user must have the Create/Edit Block behavior control set to allow in Identity Management.
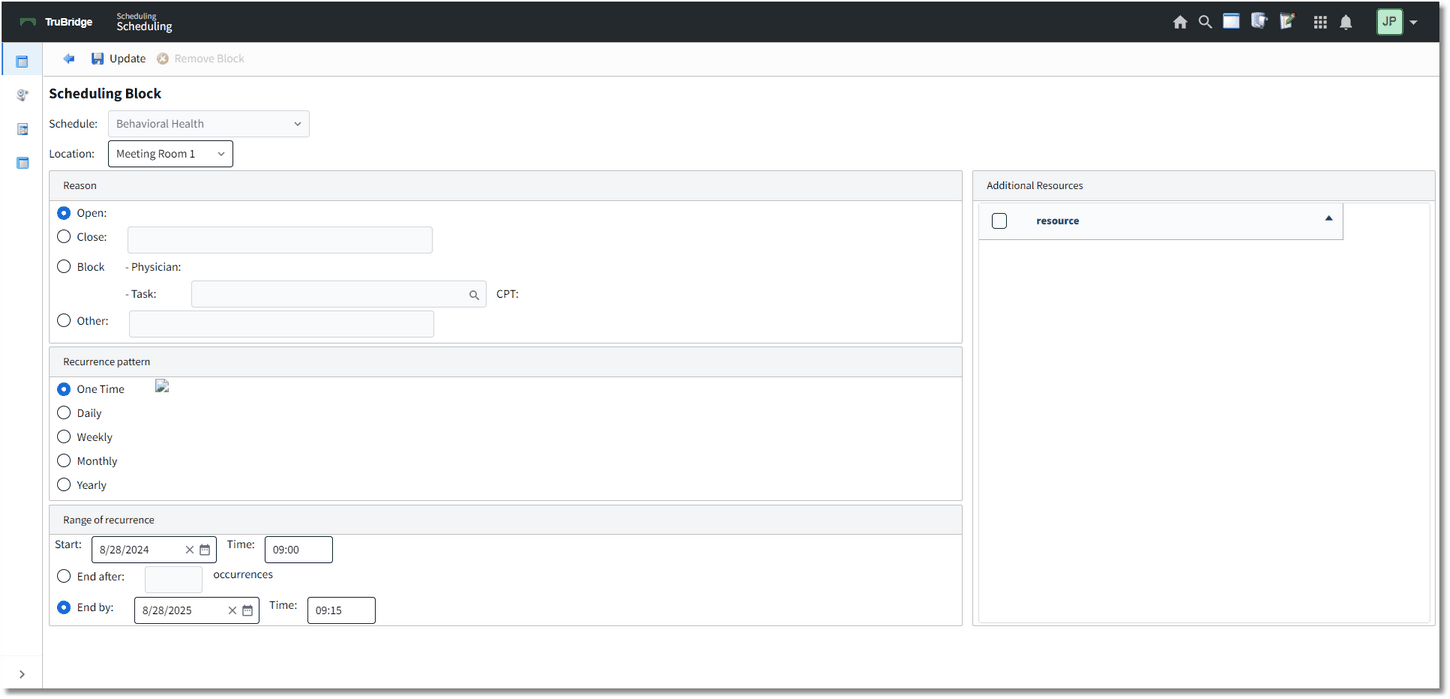
The Scheduling Block screen will then display. The Schedule and Location that was selected from the grid will display at the top of the screen. Select the drop-down menu(s) to change the Schedule and/or Location if needed. The Reason, Recurrence Pattern and Range of Recurrence sections will need to be completed depending on the type of block and how often/long the block will occur.
NOTE: Additional resources may only be added to a block from the Locations and Personnel tables.
Select Web Client > Scheduling > Select Date and Time > Block
Scheduling Block
Below is an explanation of each section:
•Reason: Select the reason why the schedule is being blocked.
•Open: Select this option to allow a resource to be open for a day and time that is typically closed.
•Close: Select this option if the resource will be closed. If selected, free-text the reason for the closure.
•Block: Select this option to block the schedule for a physician or for a group task.
•Physician: Reserved for future programming.
•Task: Select this option to block the schedule for a group task. If selected, use the lookup to select the group task set up in the tables. If a task has a CPT associated with it, it will display at the end of the line.
•Other: Select this option if the schedule block will be for any other reason. If selected, free-text the reason for the closure.
•Assigned Color: Double-click on this option to assign a color to the closure, to appear on the scheduling grid. This option will only be available when Close or Other is selected.
NOTE: The reason that is selected will appear on the scheduling grid.
•Recurrence Pattern: Select how often the schedule block will occur.
•One Time: Select this option if the scheduling block will be occurring one time.
•Daily: Select this option if the scheduling block will be occurring on a daily basis. If this option is selected, more options will become available.
•Every __ day(s): Select this option if the scheduling block will be occurring every set number of days. If selected, populate the number of day(s) the block will recur.
•Every weekday: Select this option if the scheduling block will be occurring Monday thru Friday.
•Weekly: Select this option if the scheduling block will be occurring on certain days of the week, every week. If selected, the days of the week will become available to be selected.
•Monthly: Select this option if the scheduling block will be occurring on certain days of the month. If this option is selected, more options will become available.
•Day __ of every __ month(s): Select this option if the scheduling block will be occurring on a certain date each month. If selected, populate the day of the month, followed by number of month(s) the block will recur.
•The __ ____ of every __ month(s): Select this option if the scheduling block will be occurring on a certain week and/or day each month. If selected, use the drop downs to select how often (first Monday of the month, last weekday of the month etc.) followed by the number of month(s) the block will recur.
•Yearly: Select this option if the scheduling block will be occurring on the same day of the year every year. If this option is selected, more options will become available.
•Every __ __: Select this option if the scheduling block will occur on the same day of the month every year. If this option is selected, use the drop down to select the month, followed by the day of the month.
•The __ __ of __: Select this option if the scheduling block will occur on week and/or day each year. If selected, use the drop downs to select how often (last Thursday of the month, first weekend of the month etc.) and then select the month the block will recur each year.
•Range of Recurrence: Select how long the schedule block will last.
•Start/Time: Select the date and time the schedule block will start. This will default to what was selected from the scheduling grid.
•Block Duration (Hours/Minutes): Populate the hours and minutes to be blocked on the scheduling grid.
•No End Date: Select this option if the schedule block has no end date.
•End after __ occurrences: Select this option if the schedule block will end after so many occurrences. If selected, populate how many times the schedule block will occur.
•End by/Time: Select this option if the schedule block has a certain date and time it will end.
After all the information for the schedule block has been entered, select ![]() Update from the action bar. To remove a recurring schedule block, select
Update from the action bar. To remove a recurring schedule block, select ![]() Remove Block from the action bar.
Remove Block from the action bar.
NOTE: If there are conflicts with another scheduling block or a scheduled patient, a warning will appear alerting the scheduler. If the user has the Override Scheduling Blocks behavior control set to "Allow" in Identity Management, the system will allow the user to continue to block the schedule.
The block will display on the scheduling grid along with the reason selected from the Scheduling Block screen. If additional changes need to be made to the schedule block, double-click it on the scheduling grid to display the Scheduling Block screen.
NOTE: If needing to remove a block from the scheduling grid that has additional resources attached to it, a message will display stating that this occurrence, or all future occurrences, will be deleted for all additional resources.