|
<< Click to Display Table of Contents >> Push Board |
  
|
|
<< Click to Display Table of Contents >> Push Board |
|
Administrators have access to the Push Board icon in the upper-right corner of the Patient Data Console screen. This icon is used to push a board to the appropriate user(s). The administrator must first create a group for the users and then push the board to that group.
The first step in pushing a board to other users is to create a group.
1.Select the Push Board icon ![]() .
.
2.Select the Filter icon ![]() .
.
3.Select the Create or Delete Group icon ![]() ; then enter a name for the group and select Save.
; then enter a name for the group and select Save.
4.Use the search box that appears to find and select the users to add to the group. Only active users will display in the search results, along with their UBL information. (NOTE: If you add a user by mistake, select the red "x" to remove them.) The system automatically saves the group as you add users to it.
5.Once all users have been added, select Back to return to the Manage Groups panel; then select Close to close the panel.
After a group has been created, a board can be pushed to that group.
Groups can be edited or deleted as necessary.
1.Select the Push Board icon ![]() .
.
2.Select the Filter icon ![]() .
.
3.To edit a group, select the group from the drop-down; then add or edit users as necessary.
or
To delete a group, select the Create or Delete Group icon ![]() ; then select the red "x" next to the group you want to delete. Select Yes when prompted to confirm the action.
; then select the red "x" next to the group you want to delete. Select Yes when prompted to confirm the action.
1.Select the Push Board icon ![]() from the board you want to push.
from the board you want to push.
2.Select the group from the Select group name drop-down.
3.Select the drop-down below the group name and choose the users to push the board to. To select all users, select the check box next to the search field. To select only specific users within the group, select the check box next to the individual names. Use the search field to locate specific users if needed.
4.Select Push Board to push the board to the selected users. (NOTE: Selecting Close will cancel the push action.)
1.From the Boards menu (collapsed view), select the Expand Board icon.
2.Within My Boards, select the check box for each board you want to push. A count will display in red at the top of the expanded board view identifying how many boards are selected. (Selecting the count will deselect all boards.)
3.Select the Push Board icon and complete the push process as described in To Push a Single Board, above.
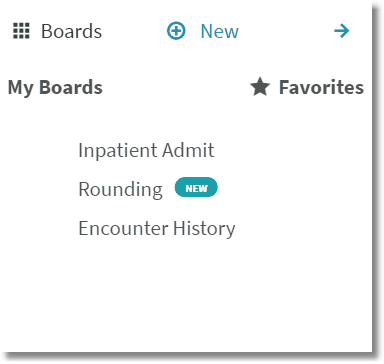
The recipient of a pushed board will see an indicator on their Boards tab that new boards have been pushed to their login. The indicator will show the number of new boards that the user received. "New" will also display next to the board within the Boards tab and within the board in the expanded view. Once the user opens the board for the first time or edits it, the indicator will no longer display.

Pushed Board Indicator
Board Menu