|
<< Click to Display Table of Contents >> Signature Area |
  
|
|
<< Click to Display Table of Contents >> Signature Area |
|
Signatures may be entered on the Electronic Form by using the Signature Area setup. The signature area currently functions with the mouse, Tablet PCs and the digital signature pads (Topaz Signature GEM LCD tablets 1x5 & 4x3 Models T-L462 HSB-R and T-L755 HSB.) Currently, there is a limit of 6 signature areas per page that will save on the patient's form.
1.Select New Control.
2.Select Signature Area.
Select Electronic Form Maintenance > Electronic Form > New Control > Signature Area

Signature Area
3.Select Disable if the Signature Area is to be inactive on the electronic form but is not to be deleted from the setup. A disabled control will have an asterisk (*) appear next to the control number on the Electronic Form Maintenance display. When the form is previewed, the control will not appear on the screen.
4.If the signature is to appear on a new line, select Start New Line from the Signature Area Maintenance screen.
5.Enter the number of spaces that will be before the signature area by selecting the Leading Spaces field and enter the number of spaces.
6.Select the Label field to enter the description that will display on the Electronic Form for the signature area.
7.Enter the number of spaces that will be on the Electronic Form after the signature area by selecting the Trailing Spaces field and enter the appropriate number of spaces.
8.To set the font type, if different than the default setting, select the Font Type field.
9.To set the font size, if different than the default setting, select the Font Size field.
10.If the text is to display in bold on the Electronic Form, select Font Style – Bold.
11.To set the font color, if different than the default setting, select Change in the Font Color field.
12.Select the Signature Format tab to setup the field size on the Electronic Form.
Select Electronic Form > New Control > Signature Area > Signature Format
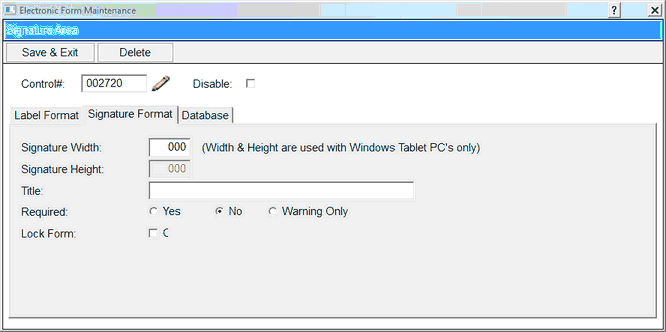
Signature Format
13.Select the Signature Width field to set the width (size for the signature area). This is only used for "Previewing" an Eform. In Web Client forms, all signature boxes are the same size.
14.The Signature Height field will automatically apply a height that is half the size of the Signature Width entered. This field is disabled to maintain a 2:1 ratio. This is only used for "Previewing" an Eform. In Web Client forms, all signature boxes are the same size.
15.In the Required field, select Yes, No, Warning Only. The default is blank/No. If Yes is selected for the control, the user will not be able to go to another page, print, lock, or exit the form without addressing the appropriate field(s). If Warning Only is selected, the user is given a prompt that this question should be addressed on the form, but TruBridge EHR will allow going to the next page, printing, locking, or exiting the form without addressing the field. The information entered in the Title field on the answer tab of the control will display on the prompt as the description of the field that should be addressed.
NOTE: Currently, if the form is a multiple page form and all pages are not accessed, TruBridge EHR will not prompt the user that there are required or warning only controls set up on pages that are not accessed. However, if the user does access the other pages, the appropriate prompts will display.
16.Select Lock Form if the form will be automatically locked after the signature is added and the form is saved.
17.To save the setup for the Signature Area, select Exit & Save. (To exit without updating or saving the control setup, select Delete.)