|
<< Click to Display Table of Contents >> Text Area |
  
|
|
<< Click to Display Table of Contents >> Text Area |
|
Text Areas are used as a free text area that consists of multiple lines.
NOTE: There is a limit of 20 text areas per form, data loss will occur if this limit is exceeded.
1.Select New Control.
2.Select Text Area.
Select Electronic Form Maintenance > Electronic Form > New Control > Text Area
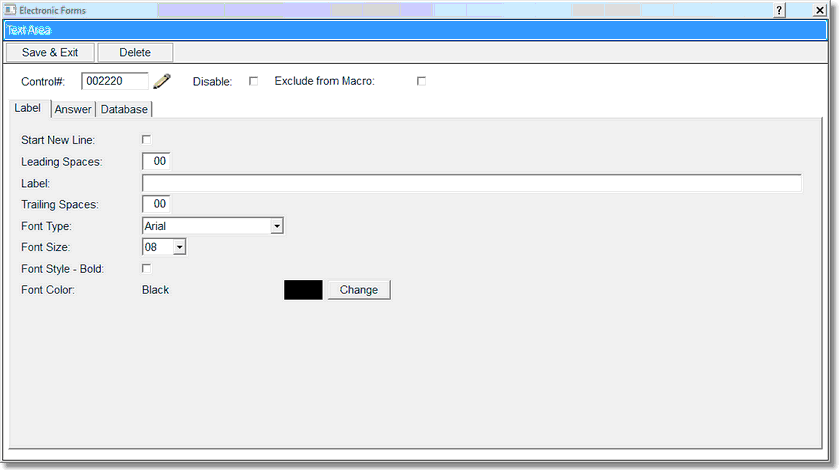
Text Area Control
3.Select Disable if the Text Area is to be inactive on the electronic form but is not to be deleted from the setup. A disabled control will have an asterisk (*) appear next to the control number on the Electronic Form Maintenance display.
4.If the text area is to begin on a new line, select Start New Line.
5.Enter the appropriate number of spaces prior to the text area label by entering Leading Spaces.
6.Enter the description of the text area by selecting the Label field. This will display on the Electronic Form when accessed for use. The Text Area may have a maximum of 100 characters in a one column form if using a font size of 8, this includes characters in the label field. If the font size is increased, then the number of characters on the answer size will be decreased accordingly.
7.Select the font type.
8.Select the font size.
9.Set the font in bold by selecting the Font Style – Bold field.
10.Set the font color if it is to be different than the default setting, select Change in the Font Color field.
11.To set the length of the text field and font size of the text, select the Answer tab.
Select Electronic Form Maintenance > Electronic Form > New Control > Text Area > Answer
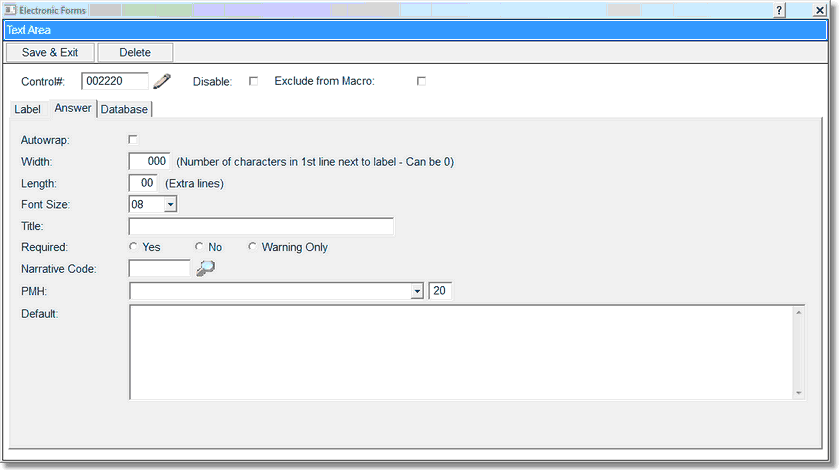
Text Area Control Answer Tab
12.Select Autowrap in order for the text area to have the text wrap capability.
NOTE: When Autowrap is checked, the leading spaces, trailing spaces, font type, font size and bold options cannot be changed on the label tab.
13.Select the Width field to set the number of characters the text area will accommodate. If the font size is increased from 8 points, then the number of characters on the answer size will be decreased accordingly.
14.To set extra lines for the text area, select the Length field and enter the number of extra lines to be added to the Electronic Form. A minimum of 2 lines is needed.
15.Set the answer font size by selecting the Font Size field. The options for font size are 08, 10, or 12.
16.The Answer Title field is used to enter a description that will display on the Changes Detail screen when viewing changes on the Electronic Form.
17.In the Required field, select Yes, No, or Warning Only. If Yes is selected for the control, the user will not be able to go to another page, print, lock, or exit the form without addressing the appropriate field(s). If Warning Only is selected, the user is given a prompt that this question should be addressed on the form, but TruBridge EHR will allow going to the next page, printing, locking, or exiting the form without addressing the field. The information must be typed in the Title field on the answer tab of the control and will display on the prompt as the description of the field that should be addressed.
NOTE: Currently, if the form is a multiple page form and all pages are not accessed TruBridge EHR will not prompt the user that there are required or warning only controls set up on pages that are not accessed. However, if the user does access the other pages, the appropriate prompts will display.
18.The Narrative Code and PMH fields are no longer used.
19.Default: A default answer may be entered in this box which will appear when the form is opened on the patient. This answer may then be changed if needed.
20.Select the Database tab to add a database code to the control.
21.Select the magnifying glass icon. This will open the Database Links screen. Select the appropriate link from this listing. Only Form codes are available to use with the text area. Database, Formless codes and Multi-application codes cannot be used with a Text Area.
22.Once the information has been entered, select Save & Exit to save the information, select Delete to exit no save.