|
<< Click to Display Table of Contents >> Vital Signs and Current Medications |
  
|
|
<< Click to Display Table of Contents >> Vital Signs and Current Medications |
|
All vital signs are selected from the form control titled Vital Signs. When this control group is selected in electronic forms setup, the answer tab will have a drop-down with the available Vital Sign options. The user will see a box with the word "New" and will double click to the vitals application.
To add this control to a form:
1.Select New Control.
2.Select Vital Signs.
3.The Vital Signs Maintenance screen will appear.
Select Electronic Form Maintenance > Electronic Form > New Control > Vital Signs
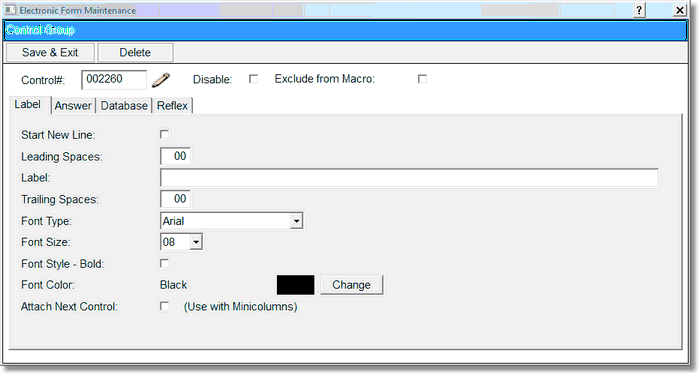
Vital Signs Label
4.Select Disable if the Vital Signs Control is to be inactive on the electronic form but is not to be deleted from the setup. A disabled control will have an asterisk (*) appear next to the control number.
5.Select Start New Line for each new vital signs control.
6.Enter the appropriate number of spaces before the Vital Signs Control by keying in Leading Spaces.
7.Enter the description of the Vital Signs Control in the Label field. The description entered in the label field will display on the Electronic Form.
8.Enter the trailing spaces if more than 00 by keying in the Trailing Spaces.
9.Set the font, if different than the default, by selecting the Font Type field.
10.To change the font setting, select the Font Size field.
11. For the font to display in bold, select the Font – Bold field.
12. If the font is to display in a color that is not the default setting, select Change in the Font Color field.
13.Select the Answer tab.
Select Electronic Form Maintenance > Electronic Form > New Control > Vital Signs > Answer
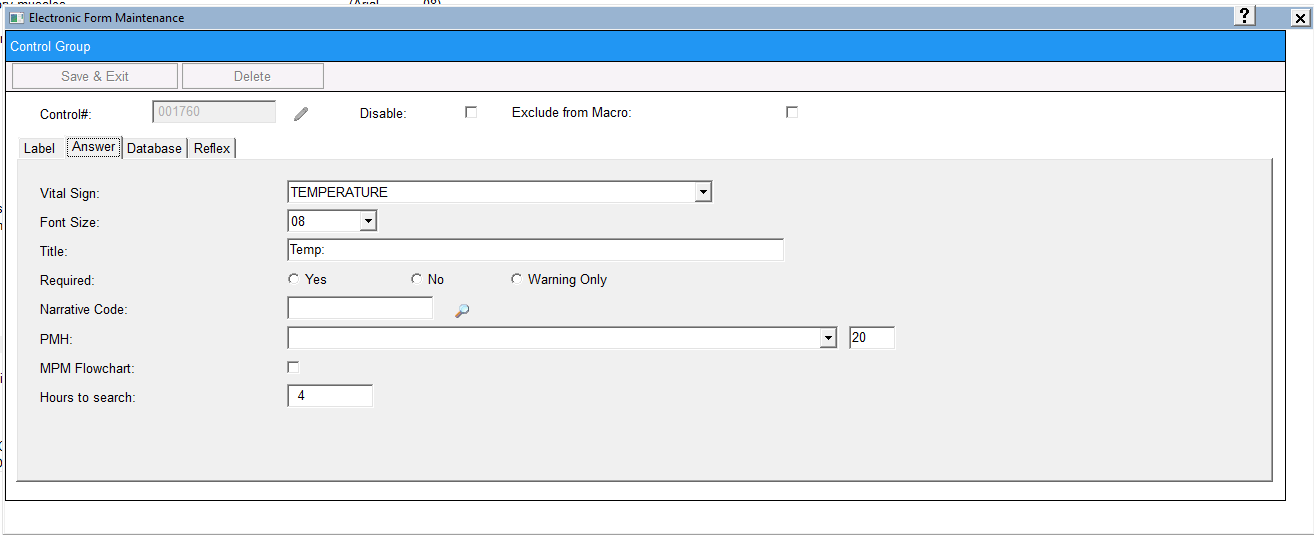
Vital Signs Answer
14.In the Vital Sign field, select the vital sign to be used for the setup and charting of that particular vital sign.
15. Select the arrow on the Vital Sign field to see the vital signs that are available. Select the correct vital sign from the list to add it to the field.
16.To set the font size, select the Font Size field. The options are 08, 10, and 12.
17.The Title field may be used to enter a description that will display on the Changes Detail screen when charting on the Electronic Form application. There must be a title in this field if the vital sign control is set to Required or to have a Warning appear if the question is not addressed.
18.If Required is selected for the control, the user will not be able to go to another page, print, lock, or exit the form without addressing the appropriate field(s). If Warning Only is selected, the user is given a prompt that this question should be addressed on the form, but TruBridge EHR will allow going to the next page, printing, locking, or exiting the form without addressing the field. The pop-up message will let the user know what is required by the title which is entered on the answer title field.
19.The Narrative Code and PMH fields are no longer used.
20.Hours to Search: This indicates the number of hours that TruBridge EHR will look back at the documentation to discern if there are any vital signs results for that particular type of vital sign. If TruBridge EHR finds results for that vital sign, it will pull forward that value or documentation into this control on the electronic form as long as the data path field on the database tab of this control is set to upload or upload only on creation. Each facility will decide how many hours from which data will pull forward.
NOTE: This entry must be filled in for the answer to flow from the flowchart or to the flowchart or Virtual Chart as well as flow to Clinical Information, Census or Profile area or to another form on the same stay.
21.Select the tab marked Database.
Select Electronic Form Maintenance > Electronic Form > New Control > Vital Signs > Database
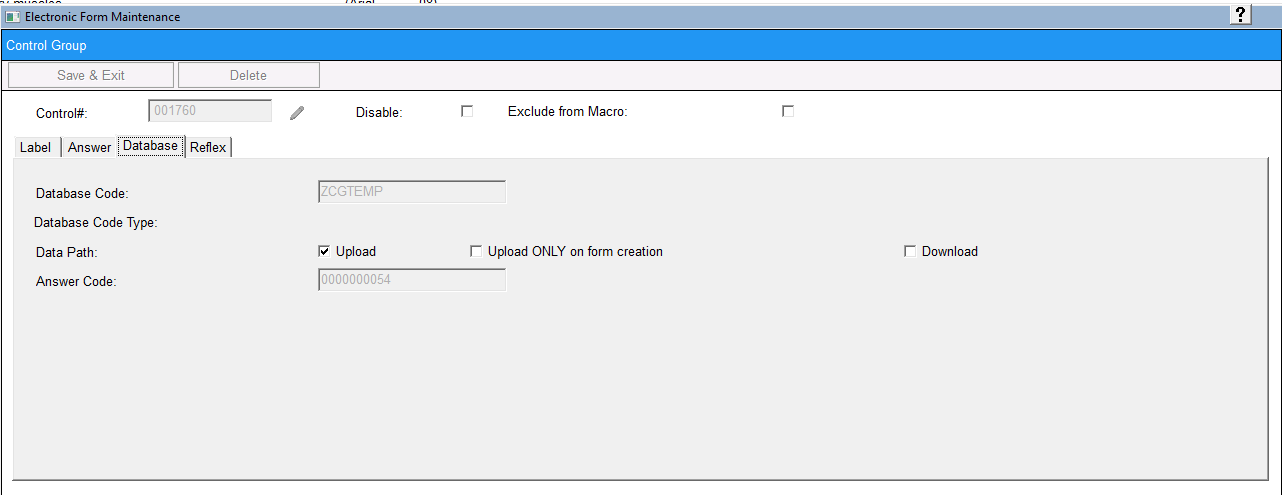
Vital Signs Database
22.The Database Code field will auto-fill with the appropriate database code for that type of Vital Sign.
23.Select the Data Path to have information pull to the Electronic Form or load from the Electronic Form to TruBridge EHR. For Vitals, select Upload.
24.Select the Reflex tab.
Select Electronic Form Maintenance > Electronic Form > New Control > Vital Signs > Reflex
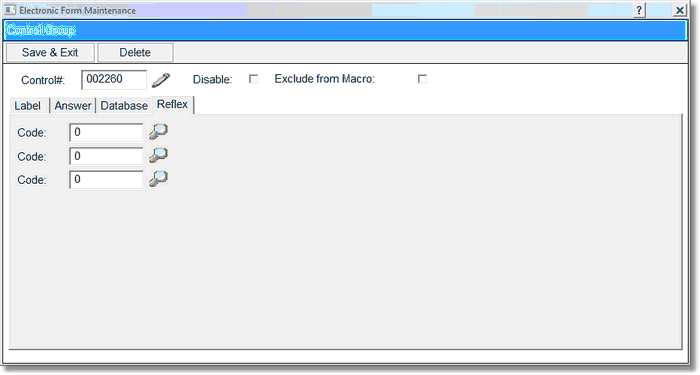
Vital Signs Reflex
25.Enter the appropriate reflex code in the first available field or select the magnifying glass to access the Reflex Look-up. A maximum of three reflexes may be set per control. (Please refer to Reflexing Chapter for more information on reflexing.)
26.An (R) appears on the maintenance screen when a vital signs control has a reflex code in the setup.
27.To save the setup, select Save & Exit.
28.To exit no update, select Delete.