|
<< Click to Display Table of Contents >> Example Table Setup for View Only Allergies |
  
|
|
<< Click to Display Table of Contents >> Example Table Setup for View Only Allergies |
|
The following steps are an example of the recommended setup for building View Only Allergies, Reaction and Severity within a Minicolumn on an Electronic Form. This table is based upon an 8 pt. font. Increasing the font size within the table will possible cause it to print off of the right hand side of page if the Electronic Form is printed.
1.Select New Control and choose a Layout Control.
2.Select the Minicolumn radio button option.
3.Set the minicolumn percentage to 37 - 42 - 21. A border type (any selection), a border width of 1 and any color modifications may be added if desired. Then select Save and Exit. For the example below a width of 1 and border type of solid were selected.
4.Select Cancel on the 'Auto-Create Mini-Column Grid!' prompt.
5.Select New Control and choose a Text Label.
6.Enter Allergies in the Label field. This will label the entire column of the minicolumn as Allergies. Select Save and Exit after any desired font modifications have been made. For the example below the following font selections were made: Center and Font Style - Bold.
7. Repeat the steps 5-6 to create Text Labels for Reactions and Severity.
Allergy Setup:
1.Select New Control.
2.Select Text Box. A label does not need to be entered within the Label tab when using this mini-column setup.
3.Select the Database tab to associate a database code to the text box.
4.Select the Magnifying Glass and choose the database code *PATALLER to pull in the View Only allergy. The notification "Automatically changed your answer size from 00 to 35" will display, select OK. This is notifying the user that it is adjusting the answer width on the answer table to the appropriate width needed for the database code. The data path does not need to be addressed since the database code selected is hard coded to be Upload Only.
5.Select the Answer tab. The width was automatically filled by adding the database code prior to accessing the answer tab, so that will not need to be modified. In the Title field enter "Allergy #," where the "#" is the number that the allergy will be. For example, the first text box with the *PATALLER database code will be Allergy 1.
6.Select Save and Exit.
Reaction Setup:
1.Select New Control.
2.Select Text Box. A label does not need to be entered within the Label tab when using this mini-column setup.
3.Select the Database tab to associate a database code to the text box.
4.Select the Magnifying Glass and choose the database code *PATALREAC to pull in the View Only allergy reaction. The notification "Automatically changed your answer size from 00 to 40" will display, select OK. This is notifying the user that it is adjusting the answer width on the answer table to the appropriate width needed for the database code. The data path does not need to be addressed since the database code selected is hard coded to be Upload Only.
5.Select the Answer tab. The width was automatically filled by adding the database code prior to accessing the answer tab, so that will not need to be modified. In the Title field enter "Reaction #," where the "#" is the number that the allergy reaction will be. For example, the first reaction text box following the first allergy would be Reaction 1.
6.Select Save and Exit.
Severity Setup:
1.Select New Control.
2.Select Text Box. A label does not need to be entered within the Label tab when using this mini-column setup.
3.Select the Database tab to associate a database code to the text box.
4.Select the Magnifying Glass and choose the database code *PATALSEVR to pull in the View Only allergy reaction. The notification "Automatically changed your answer size from 00 to 20" will display, select OK. This is notifying the user that it is adjusting the answer width on the answer table to the appropriate width needed for the database code. The data path does not need to be addressed since the database code selected is hard coded to be Upload Only.
5.Select the Answer tab. The width was automatically filled by adding the database code prior to accessing the answer tab, so that will not need to be modified. In the Title field enter "Severity #," where the "#" is the number that the allergy severity will be. For example, the first severity text box following the first allergy would be Severity 1.
6.Select Save and Exit.
7.Repeat the setup for Allergies, Reactions and Severity for each row of allergies needed.
8.Once all allergy rows are completed, select New Control. Then select a Layout control and choose the End Minicolumn radio button option.
Helpful Hints:
•Copy and Paste may be used. If a single row of Allergy/Reaction/Severity setup is copied, make sure the Answer title is changed to reflect the correct corresponding allergy/reaction/severity number.
•Allergies/Reactions/Severity will pull from Clinical Information or the Allergy application going from left to right. This is the order that should be used when adding numbering to the allergy/reaction/severity controls.
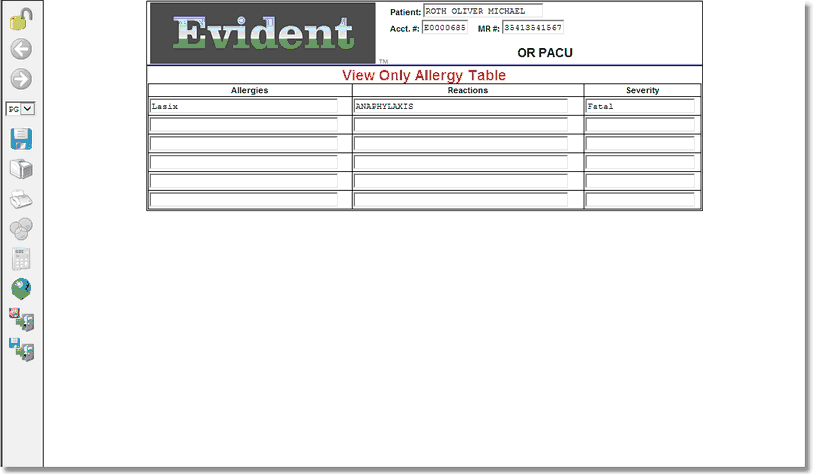
Allergy Table Example