|
<< Click to Display Table of Contents >> Image Area |
  
|
|
<< Click to Display Table of Contents >> Image Area |
|
The Image Area may be used to insert an image into the Electronic Form such as the facility logo or images of body parts that may be viewed on the form.
1.Select New Control.
2.Select Image Area.
Select Electronic Form Maintenance > Electronic Form > New Control > Image Area
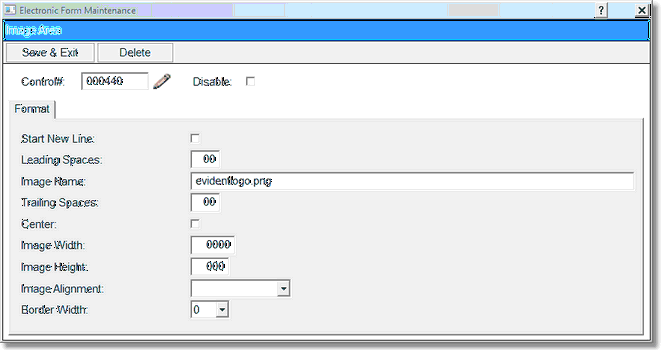
Image Area
3.To place the image area at the top of the Electronic Form, select the Control# field and change the control number.
4.Select Disable if the Image Area is to be inactive on the electronic form but is not to be deleted from the setup. A disabled control will have an asterisk (*) appear next to the control number on the Electronic Form Maintenance display.
5.If the image is to be on a new line of the Electronic Form, select Start New Line.
6.Enter the number of spaces before the image by selecting the Leading Spaces field.
7.Select the Image Name field to enter the name of the image. If this is the facility logo, this name is supplied by TruBridge personnel. Contact TruBridge in order to have your logo available for use on your forms.
8.Enter the number of spaces to follow the image by selecting the Trailing Spaces field and entering the number of spaces.
9.If the image is to be centered, select Center.
10.If the image width is to be changed, select Image Width.
11.If the image height is to be changed, select Image Height.
12.The image may be aligned on the electronic form by selecting Image Alignment. Options: top, middle, bottom and left.
13.To set a border, select the Border Width field, options are 1, 2, 3, 4, and 5.
14.To save the image, select Save & Exit. To exit no update, select Delete.
The following images are available for Electronic Forms:
activity.png |
AnkleFlexion.jpg |
anklepumps.png |
armflexion.png |
ArmPendS2s.png |
axialextension.png |
BMI2.png |
BMIColorChart.png |
breats.png |
buttocksqueezes.png |
circle.png |
ComfortScale.png |
ComfortScale2.png |
crutchcar.png |
crutchchair.png |
crutchchwbat.png |
crutchdownstairs.png |
crutchnwb.png |
crutchplacement.png |
crutchpwd.png |
crutchttwb.png |
crutchupstairs.png |
dermatones.png |
diet.png |
dorisflexionactive.png |
dorisplantarflexion.png |
ElbowFlexion.jpg |
elbowflexion001.png |
extensionstretch.png |
FingersFlex.jpg |
FingerSpread2.png |
followup.png |
hamstringflexion.png |
HANDABOVEHEART1.png |
HANDABOVEHEART2.png |
handexercises.png |
HandSpread.png |
Handsqueeze.png |
heelslides.png |
hipabductionadduction.png |
hipextension.png |
hipflexion.png |
hipprecaution1.png |
hipprecaution2.png |
ImmChart2.png |
incisioncare.png |
KneeFlexion.jpg |
KneeFlexion2.png |
KnuckleBend.png |
kyphosis.png |
LowerExt1.png |
Malamcolor.png |
Mallampati3.png |
medication.png |
nasal.png |
Obstetric.png |
painfaces1.png |
painfaces2.png |
PainScaleLarge.png |
peniscatheter.png |
posteriorpelvicrotation.png |
posturechair.png |
posturelift.png |
posturestarting.png |
PTCYLINDRICAL.png |
PTFIST.png |
PTHOOK.png |
PTIPPINCH.png |
PTLATPINCH.png |
PTSPHERICAL.png |
PTTRIPODCHUCK.png |
PulseOxCCHD.png |
pupilchart.png |
pupilsize.png |
quadextension.png |
quadsets.png |
roundedshoulders.png |
scapularretraction.png |
scoliosis.png |
shapes03.png |
shortarquads.png |
shoulderabduction.png |
shoulderelevation.png |
shoulderexternalrotation.png |
shoulderextrotationabduction.png |
shoulderflexion.png |
shoulderhorizadduction.png |
shoulderrotation.png |
sitcalfstretch.png |
straightlegraises.png |
Stretch001.png |
Tabletophand.png |
Tibap.png |
Tiblateral.png |
vaginacatheter.png |
VentWeaning.png |
Warning.png |
WarningSmall.png |
WarningSmallest.png |
waterbottles.png |
WheelchairPosition.png |
WheelchairPosition2.png |
WristFlexion.jpg |
WristFlexion2.png |
WristFlexion3.png |
NOTE: After selecting Save & Exit, select Preview to view the Electronic Form. Right click on the image area and select Properties. In the dimensions field, will be the width and height of the image. Return to setup of the Electronic Form and enter these dimensions into the width and height fields so that the size of the image is true. For example, if using the pupil chart, entering the correct width and height will assure that the images will display and be accurate in size.