|
<< Click to Display Table of Contents >> Registering a New Visit |
  
|
|
<< Click to Display Table of Contents >> Registering a New Visit |
|
To register a new visit for a scheduled appointment, begin by double-clicking the patient's name from the grid.
Then, select ![]() Link from the action bar.
Link from the action bar.
Select ![]() New Visit from the action bar.
New Visit from the action bar.
NOTE: In order to select the New Visit option, users will need the Census control behavior Allow Registration set to "Allow" within Identity Management.
The Visit Information screen will then display. This screen will allow information that is related to the visit to be entered.
Select Web Client > Scheduling > Select Appointment > Link > New Visit
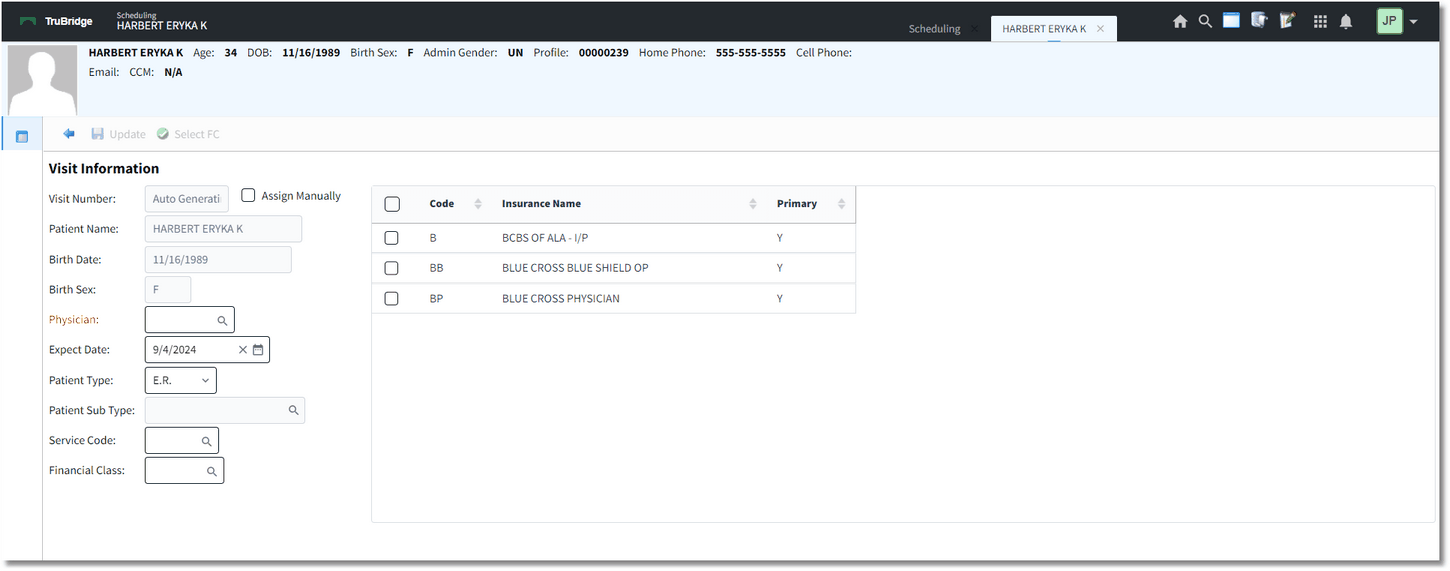
Visit Information
Below is an explanation of each field:
•Visit Number: The visit number will default to Auto Generating. Selecting the Assign Manually check-box to the right of the Visit Number field will make the Visit Number field accessible so that the visit number may be manually assigned.
•Patient Name: This is the patient's name as it appears on the Patient Profile screen.
•Birth Date: This is the patient's date of birth as it appears on the Patient Profile screen.
•Sex: This is the patient's gender as it appears on the Patient Profile screen.
•Physician: The user must select the attending physician from the physician look-up. If a physician is not selected, the prompt "Can't save. Please enter a valid Physician number" will display.
•Expect Date: The expect date will default to the patient's scheduled appointment date that was selected from the scheduling grid. This date may be changed if necessary.
•Patient Type: The user must select the stay type from the drop-down menu.
•Patient Sub Type: Select the sub type from the drop-down list, if applicable.
•Service Code: The service code field may be edited by entering the desired service code or selecting the magnifying glass icon to open a look-up menu for service codes. Double-click the desired service code to add it to the Visit Information screen.
•Financial Class: Select the appropriate insurance coverage(s) from the insurance list that displays on the right, then choose ![]() Select FC from the action bar. If the desired insurance coverage is not listed or there are not any insurance coverages listed, select the magnifying glass icon in the Financial Class field to access the Insurance List screen. Highlight the desired insurance coverage(s) and select OK.
Select FC from the action bar. If the desired insurance coverage is not listed or there are not any insurance coverages listed, select the magnifying glass icon in the Financial Class field to access the Insurance List screen. Highlight the desired insurance coverage(s) and select OK.
Select ![]() Update once all of the information has been gathered. The system will then create a Temporary Visit and the Guarantor listed on the patient's profile will copy over as the Guarantor for the visit.
Update once all of the information has been gathered. The system will then create a Temporary Visit and the Guarantor listed on the patient's profile will copy over as the Guarantor for the visit.
NOTE: When the system creates the Temporary Visit, it will appear on the Exceptions Report if services were rendered. If the Temporary Visit has a zero dollar balance, it will appear on the Incomplete Register report.
The visit that was just created will then be linked to the patient's appointment.