|
<< Click to Display Table of Contents >> Radiology |
  
|
|
<< Click to Display Table of Contents >> Radiology |
|
The Radiology card displays the transcribed results of the patient's radiology exams. For each exam, the card lists the exam name, completed date/time, and status. Select the expand (chevron) icon to the left of an exam to view the ordering provider, scheduled date/time, and visit # associated with the exam.
By default, the transcriptions display sorted by completed date/time in descending order.
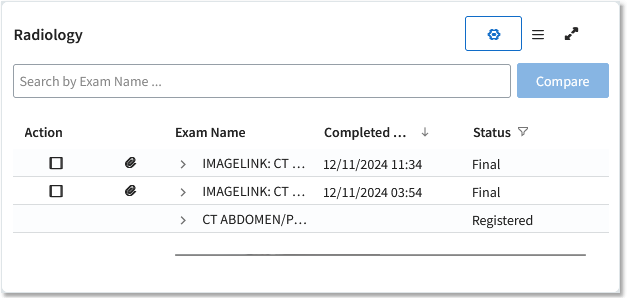
Radiology Card
•Hovering over the Exam Name, Completed Date/Time, or Status column displays a menu ![]() icon. Select this icon and make choices from the panel that displays to filter the information as desired. For example, the default filter for the Status column is set to exclude exam results with a status of Canceled or Entered in Error. You can remove this filter if you want to view those results.
icon. Select this icon and make choices from the panel that displays to filter the information as desired. For example, the default filter for the Status column is set to exclude exam results with a status of Canceled or Entered in Error. You can remove this filter if you want to view those results.
•By default, the card displays results for the current visit. To display a different date range, select the filter (cog) icon and choose the desired option.
•To locate an specific exam quickly, type search text in the Search by Exam Name field. The card will display only exams matching the text you type.
Exams with a status of final are available for viewing from the ![]() Attachment icon. The transcription will open in the PDF viewer, where users can zoom, search, and print as desired.
Attachment icon. The transcription will open in the PDF viewer, where users can zoom, search, and print as desired.
Selecting two exams within the Action column enables the Compare button. Selecting this button will display a side by side comparison of the selected exams. The oldest dated exam will display on the left and the newest exam on the right, with the completed date and time above the transcription documents.
After opening an attachment, the user can highlight the Radiology Exam Impression and copy and paste it into a note. Right-clicking the highlighted selection displays a menu with the following options:
•Copy: Copies the highlighted text to the clipboard. This option becomes enabled when text from the impression has been highlighted.
•Select All: Selects all text within the impression.
•Create New Draft: Creates a new draft note on the patient's account and inserts the highlighted text into the note. This option becomes enabled when text from the impression has been highlighted.
•Send to Draft Note: Sends the highlighted text to an existing draft note on the visit. This option becomes enabled when text from the impression has been highlighted.
The test name, completed date/time, and the user who signed it will be sent to the note along with the highlighted text.
NOTE: The user's permissions within Notes will affect the user's ability to send information from a radiology transcription to a note.
The Status column in the Radiology card will display a different status from what displays in Radiology. Below is a crosswalk of what displays in each area to assist in filtering the status column within the card.
Status in Patient Data Console |
Status in System Menu |
Amended |
Signed and amended |
Canceled |
Canceled |
Entered-in-Error |
Signed and canceled |
Final |
Signed |
partial |
Transcribed |
Registered |
Ordered |
Registered |
Completed |