To insert a table, place the cursor in the note field where the table should display. Then select the table icon. Set the number of rows, columns and any other properties as needed following the steps below:
| 1. | Enter the number of rows and columns needed within the Rows and Columns fields. |
| 2. | Select where the table Headers should display from the drop down. The following options are available: |
| 3. | Enter a Border Size if the table should have borders around the table cells. |
| 4. | Select the Alignment of the table from the drop down. The following options are available: |
| 5. | Address the table Width and/or Height within the corresponding fields. The dimensions should be entered in as pixels or a number with a valid CSS unit (px, %, in, cm, mm, em, ex,pt or pc). The default is 500 px. |
| 6. | Enter the Cell spacing and Cell padding in pixels, e.g., 1. This affects the amount of white space surrounding the text entered within the table. |
| 7. | Next, enter a Caption to label the table. The caption will display at the top of the table. |
| 8. | The Summary option is currently TruBridge Use Only. |
| 9. | Select OK to create the table, or Cancel to exit the table properties without saving. |
After selecting OK, the newly created table will display within the note field.
NOTE: For advanced setup please see Advanced Settings.
Select Web Client > Charts > Patient > Notes > Create Note > Table
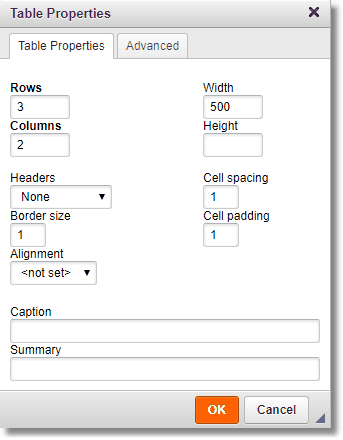
Table Properties
Once the table has been created, the Rows and Columns will not be able to be edited within the Table Properties. To edit the table cells, right-click on the table or individual to open the menu. The following options are available:
| • | Paste allows the items saved to the users clip board to be inserted into the selected cell. |
| • | Cell allows the following actions to be made within the selected cells: |
| o | Insert Cell Before: Inserts a new cell before the selected cell. |
| o | Insert Cell After: Inserts a new after the selected cell. |
| o | Delete Cells: Deletes the selected cell. |
| o | Merge Cells: Merges the selected cells into one. This option is only available if two or more cells are selected. |
| o | Merge Right: Merges the selected cell with the cells on its right. The content of both cells become joined. This option is only available if only one cell is selected. |
| o | Merge Down: Merges the selected cell with the cell below it. The content of both cells become joined. This option is only available if only one cell is selected. |
| o | Split Cell Horizontally: Splits the selected cell into two, creating a new cell to the right of the selected cell. The content of the selected cell will display in the original cell. This option is only available if only one cell is selected. |
| o | Split Cell Vertically: Splits the selected cell into two, creating a new cell below the selected cell. The content of the selected cell will display in the original cell. This option is only available if only one cell is selected. |
| o | Cell Properties: Displays the Cell properties table which allows the cells to be configured by size, type, color and content alignment. Please see Cell Properties for additional information. |
| • | Selecting Row allows the rows to be Inserted Before before the selected cell or Insert Row After. Delete Rows allows the row(s) containing the selected cell to be deleted. If a cell from each row is selected and then Delete Rows is selected the entire table will delete. |
| • | Selecting Column will allow a column to Insert Column Before or Insert Column After the selected column. Delete Columns will delete the columns of the selected cells. If a cell from each column is selected and then Delete Columns is selected, it will delete the entire table. |
| • | Selecting Delete Table will delete the entire table. |
| • | Selecting Table Properties will reopen the table properties menu listed above. |


