| 1. | From a patient visit, select Notes. |
| 2. | The Create Note panel will display by default, or select the Create Note option that displays below the Patient information. |
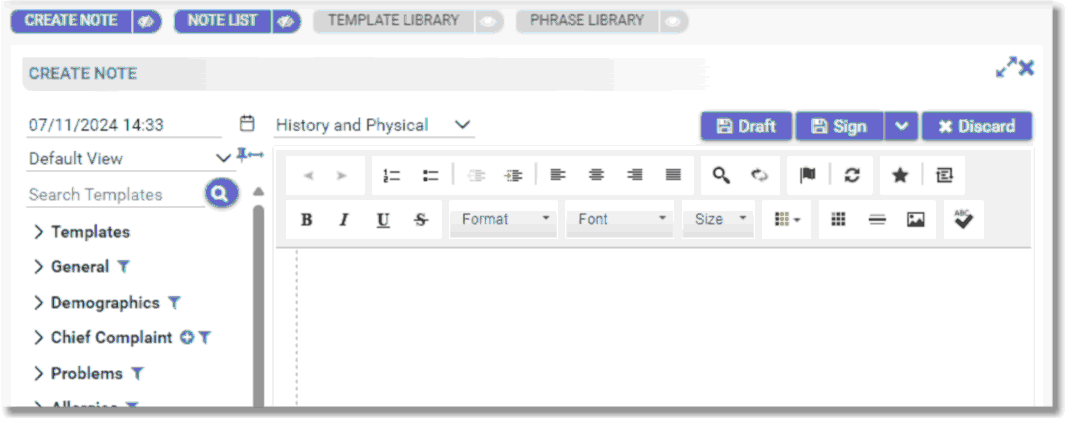
| 3. | Review and set the Date/Time. The date and time for the note will default to the current time. To modify, select the date/time field and enter the desired date/time. |
| 4. | Select the Note Type from the drop-down. A favorites list may be created to allow the user easy access to the Note Types they use most often. Select the star icon next to a note type to select it as a favorite. The user's favorite Note Types will display at the top of the list. A default note type may also be designated by selecting the  Default icon. Once a default Note Type is selected, it will dispaly as the Note Type when the Create Note panel is opened. If a Note Template is inserted and has a Note Type associated with the template, the associated Note Type will override the Default Note Type. Selecting the blank space at the top of the drop down will clear out the Note Type. The Note Type table is maintained in the Note Type table within the Notes area of Tables. Please see the Table Maintenance - Notes user guide for additional information. Default icon. Once a default Note Type is selected, it will dispaly as the Note Type when the Create Note panel is opened. If a Note Template is inserted and has a Note Type associated with the template, the associated Note Type will override the Default Note Type. Selecting the blank space at the top of the drop down will clear out the Note Type. The Note Type table is maintained in the Note Type table within the Notes area of Tables. Please see the Table Maintenance - Notes user guide for additional information. |
| 5. | Select a Filter View. Using the drop-down list, select a filter view. A filter view determines which filters display in the left navigation panel. The TruBridge EHR default is called Default View and is available for all facilities.This view may be edited. The My Favorites View displays any filters selected as favorites within the Filter Toolbox. See Filter Toolbox within the Table Maintenance User Guide for additional set up information. |
| 6. | When the thumb tack icon is selected, it will collapse the filter navigation panel. The panel may be accessed by hovering over the words Insert Into Note. Select the thumb tack icon again to display the panel. See Filters for additional information on adding filters. |
| 7. | The double sided arrow allows the navigation panel to move from the right to the left side of the note. Selecting the double sided arrow again will move it back to the left side. |
| 8. | From within the Template filter, the following options are available for selecting a template: |
| • | Select a template that displays as a favorite within the Template section. To open the template favorites, select the  icon beside the word Templates. This selection will be sticky and the templates will remain displayed until the icon is closed again. Templates that are selected as a favorite will display in alphabetical order. See Template List for favorite template setup options. The selected template will insert where the cursor is placed within the note field and may be edited as needed. If a template contains a filter and it fails to load for any reason, a red text error will display indicating that an error occurred and indicate the number of filters that failed to load. The filters that fail/error will display in the Create Note panel with a pink background to alert the user to select the filter to refresh, replace the filter using the swap icon or remove the filter that has failed from the note. The failed filters will need to be updated or removed prior to signing a Note. Users may save the note as a Draft if the filter cannot be corrected at that time. icon beside the word Templates. This selection will be sticky and the templates will remain displayed until the icon is closed again. Templates that are selected as a favorite will display in alphabetical order. See Template List for favorite template setup options. The selected template will insert where the cursor is placed within the note field and may be edited as needed. If a template contains a filter and it fails to load for any reason, a red text error will display indicating that an error occurred and indicate the number of filters that failed to load. The filters that fail/error will display in the Create Note panel with a pink background to alert the user to select the filter to refresh, replace the filter using the swap icon or remove the filter that has failed from the note. The failed filters will need to be updated or removed prior to signing a Note. Users may save the note as a Draft if the filter cannot be corrected at that time. |
| • | Search for a template using the Template Search field. Type the desired text within the ...search across name and author field and select Enter or select the Magnifying Glass to display the results in a drop down list. The selected template will insert where the cursor is placed within the note field and may be edited as needed. |
| 9. | If a template is selected, the template may have  Anchors. The cursor will default to display in front of the first anchor in the template. Select F2 to move to each anchor and add any needed documentation, or delete the anchor if no documentation should be added. If not using templates, or if additional details need to be added to the note, simply begin typing in the note field. Selecting F2 will also toggle to List Phrases that do not have a default answer. See below for additional information on anchors and formatting options. Anchors. The cursor will default to display in front of the first anchor in the template. Select F2 to move to each anchor and add any needed documentation, or delete the anchor if no documentation should be added. If not using templates, or if additional details need to be added to the note, simply begin typing in the note field. Selecting F2 will also toggle to List Phrases that do not have a default answer. See below for additional information on anchors and formatting options. |
NOTE: If the template inserted does not have any anchors, the cursor will automatically be placed at the bottom of the template.
| 10. | Note phrases may entered within a note to allow quick entry of additional information such as filters, template, list or text by entering a backslash (/) followed by the phrase. The  Favorite Phrases icon within the formatting tools will display the user’s favorite phrase listing when inserting a Note Phrase into the Note field. When selected, the star will display blue and prior to typing the Note Phrase, the Phrase List will be limited to the user’s favorite phrase listing. Deselect the Favorite Phrase option (black star) to view the full phrase search listing. This option will stay selected until the user chooses to deselect the Favorite Phrases icon. For additional information on inserting a phrase see Insert a Phrase. Favorite Phrases icon within the formatting tools will display the user’s favorite phrase listing when inserting a Note Phrase into the Note field. When selected, the star will display blue and prior to typing the Note Phrase, the Phrase List will be limited to the user’s favorite phrase listing. Deselect the Favorite Phrase option (black star) to view the full phrase search listing. This option will stay selected until the user chooses to deselect the Favorite Phrases icon. For additional information on inserting a phrase see Insert a Phrase. |
| 11. | After all documentation is completed, select Sign to sign the document or Draft to save without signing. Selecting Discard will delete the note without saving. A note type must be selected and all anchors must be addressed prior to signing. If a user requires a cosigner please see Selecting a Cosigner for more information. Additional options are available within the Sign option when a facility has purchased Communication Center and are using Web client. This will allow a note to be sent to the Communication Center for faxing, internal mail or for sending a secure text. The options will also be available when a signed note is edited and resigned, or if an addendum is added to a signed note. The note will attach as a reference link and when the recipient receives the communication selecting the link will display the note. Within the Sign option, selecting the More icon  will display the following options: will display the following options: |
| a. | Sign and Fax: When selected, the note will be signed and open the Communication Center to complete the process for the fax to be sent. |
| b. | Sign and Mail: When selected, the note will be signed and open the Communication Center to complete the process for mail to be sent. |
| c. | Sign and Text: When selected, the note will be signed and open the Communication Center to complete the process for a secure text to be sent. |
NOTE: A user will only have access to the additional options within Sign if they have the appropriate Application permissions for Communication Center - Faxing, Messaging, or Secure text.
NOTE: The note will auto save as a draft every 30 seconds. This is the default setting. The last auto save date and time will display in the bottom right hand corner of the Create Note panel. If the note is selected to close prior to an auto save or Draft being selected, the following message will display: THERE ARE UNSAVED CHANGES! Any changes you made will be lost, do you want proceed? Select Close Panel to proceed without saving or Cancel to re-access the Edit Note panel to save changes. The first auto save will push the draft note to the users homescreen.
Select Web Client > Charts > Patient > Notes > Create Note
Create Note
The following formatting options are available within the note field:
| • | Undo: (Control Z) Allows the last action performed to be reversed. |
| • | Redo: (Control Y) Allows the last Undo action to be reversed. This option becomes enabled once an Undo action has been performed. |
| • | Number List: Allows the creation of a numbered list. |
| • | Bullet List: Allows the creation of a bulleted list. |
| • | Decrease Indent: Allows the indent inserted to be removed. This option becomes enabled once an Increase Indent action has been performed. |
| • | Increase Indent: Allows an indent to be inserted into the note. |
| • | Align Left: Allows each line of text to begin on the left margin of the note. This is the default alignment option. |
| • | Center: Allows each line of text to be centered within the note. |
| • | Align Right: Allows each line of text to align on the right margin of the note. |
| • | Justify: Allows each line of text to fill the entire space from left to right, except for the paragraph indent and the last line of a paragraph. |
| • | Find: Allows a word or phrase to be located within a note |
| • | Replace: Allows a word or a phrase to be replaced within a note. |
| • | Anchor: Allows a place holder for a user to quickly move through a note by selecting F2 to add additional information. If no additional documentation needs to be added, select the anchor and remove it from the note. An anchor count will display in the top right hand corner of the note to alert the user of how many anchors need to be addressed within the note. All anchors must be addressed prior to signing. |
| • | Refresh Filters: Allows any data set that has been added to update with the latest information entered within TruBridge EHR. |
| • | Bold: Allows the text to display as bold. |
| • | Italics: Allows the text to display as italicized. |
| • | Underline: Allows the text to be underlined. |
| • | Strikethrough: Allows the text to appear as crossed out. |
| • | Paragraph Format: Allows changes in the format of text that affects an entire paragraph. |
| • | Font Name: Allows the change of the style of text. |
| • | Font Size: Allows the size of the font to be changed. |
| • | Font Color: Allows the color of the font to be changed. |
| • | Table: Allows a custom table to be inserted. See Setting Up a Table for more information. |
| • | Insert Horizontal Line: Allows a horizontal line to be inserted. |
| • | Image: Allows an image to be inserted into the note. Once an image is opened, select Choose File to import a photo from the PC. Once photo is selected, select OK to import the photo. The Advanced tab allows the user to manually adjust the size of the photo. |
| • | Medical Spell Check: Allows the Create Note field to be checked for medical misspelled words once the Medical Spell Check option is selected. The Spell Check screen will display the first misspelled medical word in red, with the other misspelled words displaying in bold. The following options will be available within the Spell Check screen: |
| o | To correct the spelling of a word, select the word from the suggested list or type in the correct spelling in the Change word ‘spellchecker’ to… field. Then select Change All to correct all misspellings of that word. |
| o | Ignore All: Allows dismissal of the notification for all the medical misspelled word(s) in the note. |
| o | Add to Dictionary: Allows the word to be added to the facility dictionary. |
| o | Manage Dictionary: Allows the words to be added or removed from the facility dictionary. The Manage Dictionary screen will display the following options: |
| ▪ | Enter the word that should be added in the Word to add or remove field. Then select Add. |
| ▪ | To remove a word from the dictionary, select the word and select Remove. |
| ▪ | Select Close to return to the Spell Check screen. |
| o | Done: Allows the Spell Check screen to be exited and returns to the Create Note field. |
NOTE: Selecting F2 will also toggle to EMPTY list phrases and anchors in the note. The Anchor Count that displays at the top of the note will not include the empty list phrases and will only continue to count the number of anchors that display within the note.
Selecting the double sided arrow in the top right hand corner of the Create Note panel will display the Create Note panel full screen. Selecting it again will re-collapse it within the 3 panel view.
Selecting the X in the top right hand corner of the Create Note panel will close out the panel. The following prompt will display if sign or draft has not been selected: "THERE ARE UNSAVED CHANGES! Any changes you made will be lost, do you want to proceed?" Selecting Close Panel will continue closing the panel without saving and selecting Cancel will reopen the Create Notes panel.


