|
<< Click to Display Table of Contents >> Create a New Template |
  
|
|
<< Click to Display Table of Contents >> Create a New Template |
|
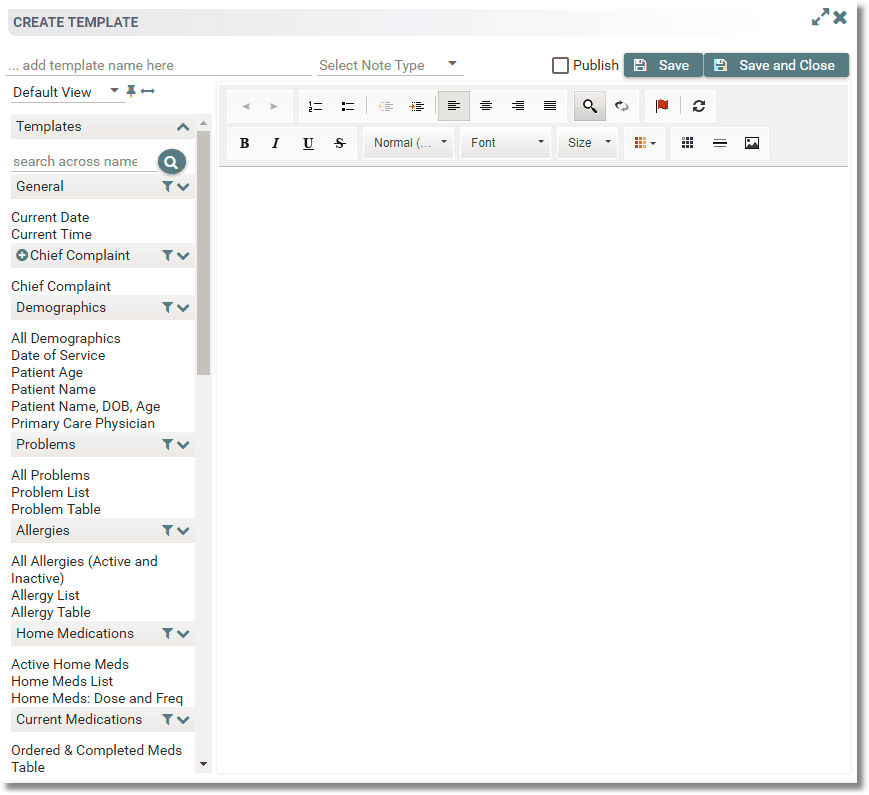
To create a new template:
| 1. | From the template Library, select Create Template. |
| 2. | A Create Template panel will display to the left of the Template Library. Enter the name of the template in the ...add template name here field at the top of the Create Template panel. In order to successfully save a template, the following items should be followed when assigning template names: |
| a. | The name of a Template must be unique. |
| b. | The name may be alpha or numeric characters but should not include any special characters other than: |
| i. | - |
| ii. | \ |
| iii. | / |
| c. | The max length for a template name cannot exceed 250 characters. |
| d. | The template must be named prior to saving. |
| 3. | Select Note Type to be associated with the template. This note type will display as the selected note type when the template is inserted within a Create Note panel unless the user has a default note type selected. To deselect an associated note type, select the blank space at the top of the Note Type drop-down to remove the selection. If more than one template is inserted into a note and both have an associated note type, the first template's note type will display. Associated note types will not overwrite a default note type. |
| 4. | Begin typing in the template the content of the template. Add any of the formatting features that are available within the toolbar at the top of the template field. See Create a Note for formatting options. |
| 5. | From the list on the left, select any filters and/or additional templates to add to the new template. Hovering over a filter shows a preview of the details within that filter. The new template shows the filter name that will pull when a note is created. The filter will display where the cursor is placed on the template prior to selecting the filter. See Filters for additional information on individual filters available. |
| 6. | Make an item or area of the template required by adding an |
| 7. | Phrases may be used when building a template. When a phrase is inserted, the reference ID will display. When the template is inserted into a Create Note Panel, the content of the phrase will then display. |
| 8. | When the template is complete, select the Publish check box to make it available within the Template Library. Publishing a template allows other users to see it and add it as a favorite. A user with administrative abilities may publish and unpublish any template. Users with only creator abilities may only publish and unpublish templates they have created. When deselecting the Publish check box, the following message will display: "Are you sure you want to unpublish this template?" Selecting Yes will unpublish the template and selecting No will cancel the action. |
| 9. | Select Save to leave the template open, or Save and Close. This will allow the template to be added to the Library and it will automatically mark the template as a favorite. |
NOTE: If the note is selected to be closed prior to an autosave or Draft being selected, the following message will display: "THERE ARE UNSAVED CHANGES! Any changes you made will be lost, do you want proceed?" Select Close Panel to proceed without saving or Cancel to re-access the Edit Note panel to save changes.
NOTE: Filters may not be inserted within other filters. Filters display with a blue background and the user may not edit anything within the blue area of the filter.
NOTE: Templates built prior to Notes 2.9.0 may display List or Text Phrases without the reference ID in a template. If List or Text Phrases are edited within the Phrase Library, they will continue to insert the pre-existing list or phrase prior to the change made within the Phrase Library if the reference ID is not used. Please see Text and List Phrase Changes document for more information.
Select Web Client > Charts > Patient > Notes > Template Library > Create Template
Create Template