|
<< Click to Display Table of Contents >> Tasks/Procedures |
  
|
|
<< Click to Display Table of Contents >> Tasks/Procedures |
|
The third table that will need to be set up is the Tasks/Procedures table. This table is used to set up any and all tasks or procedures that will be performed in the facility. Each task/procedure will be set up with the amount of time it will take to complete and then resources (locations and personnel) are then attached to each task/procedure to designate where they may be performed.
There are options at the top of the screen that will allow the list to be delimited. The Specialty Task Type drop-down will allow the list to display All, Standard, Group or OR Procedure tasks. Below the drop down, tasks may be further delimited by Active Only, Inactive Only or Both. A search option is also available to search by the selected Category.
Select Web Client > Tables > Patient Intake > Tasks/Procedures
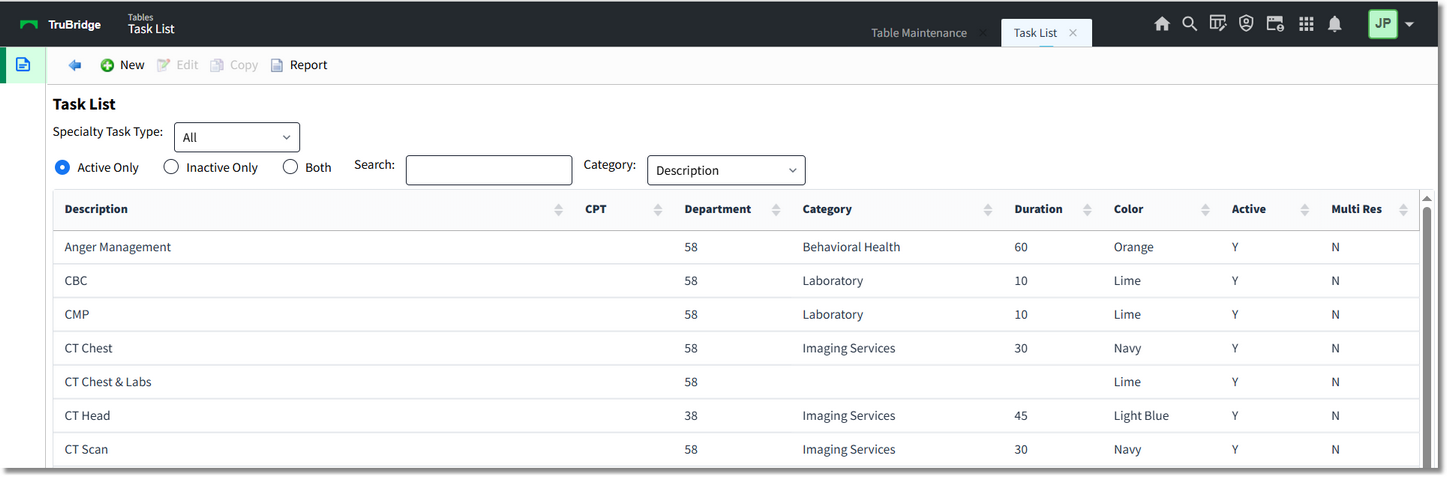
Table Maintenance - Tasks/Procedures
Below is an explanation of each column:
•Description: This column lists the task.
•CPT: This column display the CPT associated with the task. If multiple CPT's are associated with a task, the first will be listed with no CPT followed by each CPT code associated with the task.
•Department: This column is for the department that owns the task.
•Category: This column displays the category assigned to the task.
•Duration: This column displays the length of time allotted for the task.
•Color: The column displays the color assigned to the task.
•Active: The column displays a Y if the task is actively being used, or an N if the task is marked as inactive.
Action Bar options:
•New: Selecting this option will allow a new task to be created.
•Edit: Selecting this option will allow the information on the task to be changed.
•Copy: Selecting this option will allow the task information to be copied to a new task. This will include any instructions and CPT codes to copy over.
•Report: Selecting this option enables information from the Tasks/Procedures table to be exported into a report. After selecting Report, the Report Writer Parameters screen will appear, allowing filters to be applied as needed. Once all are set, select Run Report to generate the file.
NOTE: This report is also available within the Report Dashboard and it titled "Scheduling Task Table Setup".
Task Table Edit
Selecting ![]() Edit will display the Task Table Edit screen.
Edit will display the Task Table Edit screen.
Select Web Client > Tables > Patient Intake > Tasks/Procedures > Edit
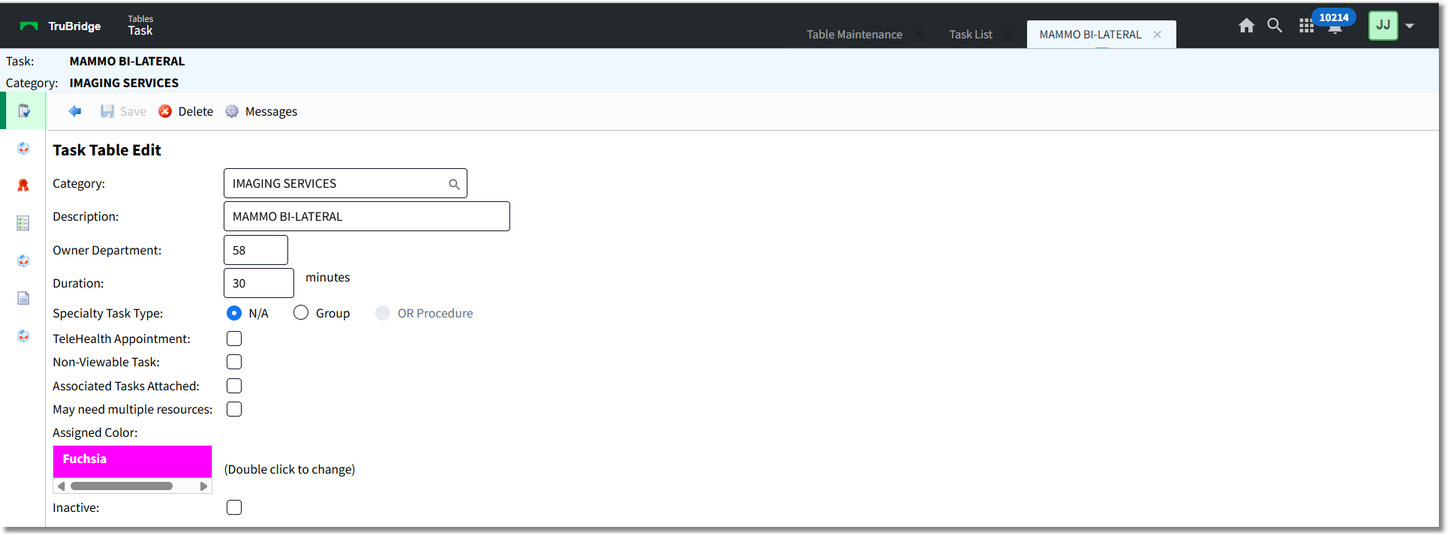
Task Table Edit
Below is an explanation of each field:
•Category: Select the![]() magnifying glass to display the category list look-up to choose the appropriate category for the task. These codes are set up in the Categories table.
magnifying glass to display the category list look-up to choose the appropriate category for the task. These codes are set up in the Categories table.
•Description: Description of the task.
•Owner Department: The department number of who will own the task. This option controls the ability to use the Check-In option from the scheduling grid.
NOTE: If a department number is not loaded, the Check-In option will not display.
•Duration: The number of minutes it will take to complete the task. This will be used to block off the appropriate amount of time on the schedule.
NOTE: When creating a new task, and a duration is not populated, once Save is selected, this field will default to 5 minutes.
•Specialty Task Type:
•Group: Select this option if this task will allow multiple patients to be scheduled for the same task from the scheduling grid.
•OR Procedure: This option is no longer used.
•TeleHealth Appointment: Select this option to designate the task as a TeleHealth appointment.
NOTE: This field will only display when the TeleHealth Appointment application is set to active for a facility.
•Max Patients Per Session: The number of patients allowed to be scheduled in a group session for the task. This field will only be visible if the Specialty Task Type field is set to Group. Only appointments at the Scheduled and Check-In status will be included in this count.
NOTE: If this number is increased, patients may be added to future group tasks until the max is met. If this number is decreased, the existing group appointments will not be affected, but future group appointments will read the max and not allow additions.
•Non-Viewable Task: Select this option to suppress the task from the Task Entry screen when scheduling a patient. This option should be used when the task should not be scheduled by itself but instead should be used as an Associated Task.
•Associated Tasks Attached: Select this option if the task will be used as a "shell" task. For example, if OR Procedure Series is setup as an Associated Task, then multiple other tasks may be attached and be scheduled simultaneously. If selected, only the Description and Owner Department fields will be accessible. The task will then look to the settings on the Associated Tasks screen. Associated Tasks must be added if this field is selected.
NOTE: When Associated Task is selected and then Save is selected, the Duration field will default to '0' minutes, but may be changed if needed.
•May need multiple resources: Select this option if multiple resources will need to be selected when scheduling the task. This will allow all resources associated to this task to be added or removed when scheduling.
NOTE: This option will be disabled if a Specialty Task Type of Group is selected.
•Assigned Color: Double-click this field to assign a color to the task on the scheduling grid. If a color is not assigned, the default color for the task will be white.
•Inactive: Select this option if the task will no longer be used. This will omit the task from any look-ups during scheduling.
•Group Note: Select the magnifying glass to select a PhysDoc Template to use as a Group Note for group tasks. This field will only been enabled if the Specialty Task Type is Group.
NOTE: In order for the PhysDoc Templates to display in this lookup, "Scheduled" will need to be selected in the Physician Documentation Templates table for each template that will be used as a Group Note.
•Individual Note: Select the magnifying glass to select a ClinDoc Document to use as an individual note for individual appointments. This field will only been enabled if the Specialty Task Type is Group.
Action Bar options:
•Save: Select this option to save any changes made to the task.
•Delete: Select this option to delete a task. If the task has been scheduled, the task cannot be deleted.
•Messages: Select this option to configure an affirmation, confirmation or reminder message to the patient when scheduling this task. Refer to the Messages section below on additional information on this option.