|
<< Click to Display Table of Contents >> Note List |
  
|
|
<< Click to Display Table of Contents >> Note List |
|
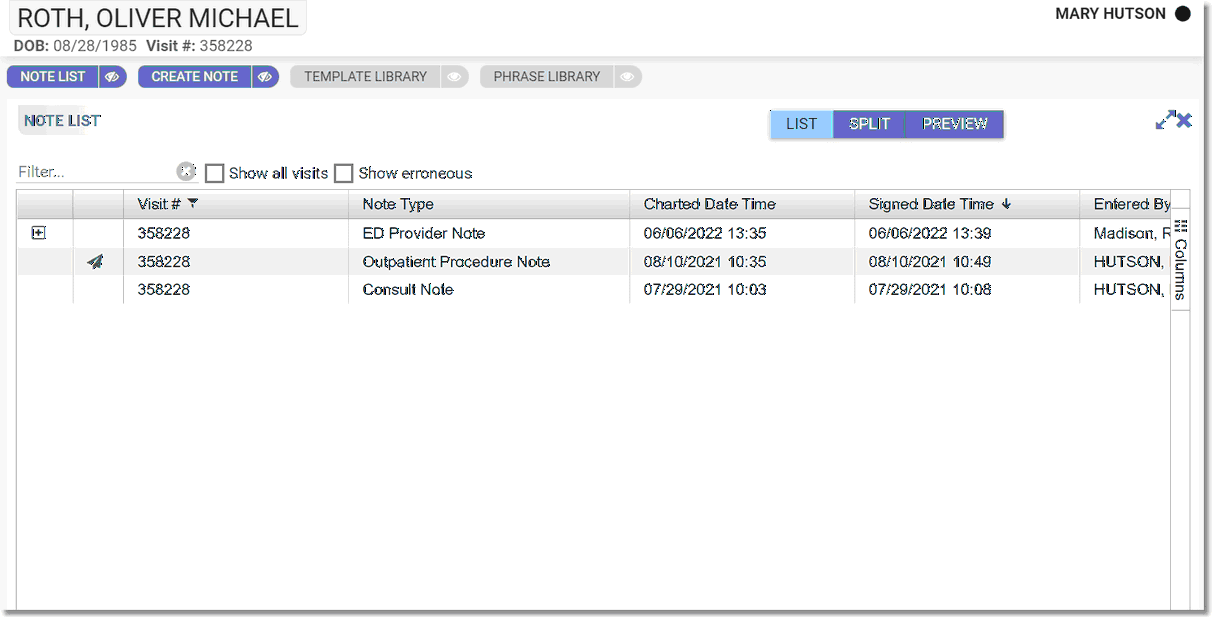
The Note List displays all notes for the patient's account or medical record. This view defaults to notes from the current visit.
NOTE: If there are no notes available for the patient the Note List will display Now Rows to Show.
To find a note that contains a specific word(s), enter the word(s) in the Filter field. To clear the filter, select the X icon . The content of the note that matches the text in the filter field will display in yellow.
Selecting the Show all visits check box will allow all notes existing within the patients profile to display.
Selecting the Show erroneous check box will display all notes marked as erroneous and they will display with a light red highlight. See Erroneous Note for additional information. These check boxes have sticky functionality. If a user logs out or changes patients, the selection of either check box will be saved and display at the next login or patient.
The Note List grid displays several columns to identity a note. The following options are available to display:
| • |
| • | ID: Displays the Note ID number that is auto-generated when a note is created. |
| • | Visit #: Displays the account on which the note was created. |
| • | Note Type: Displays the type of note that was selected on the Create Note panel. |
| • | Charted Date Time: Displays the date and time of when the note was created. |
| • | Signed Date Time: Displays the date and time the note was signed. |
| • | Entered By: Displays the name of the user who entered the information within the note. |
| • | Patient Class: Currently TruBridge Use Only. |
NOTE: The default view for the List view is: Visit #, Note Type, Charted Date/Time, Signed Date/Time and Entered By.
The grid may also be personalized to display the view using the options listed below:
| • | Change the Column Order: The columns may be placed in any desired order by selecting a column and dragging it to the desired order number. For example, if the Created Date Time field should display in the first column, select Created Date Time and drag it in front of the Visit # column. |
| • | Show/Hide Columns: In any column, select the |
| • | Change the Width and Sort Columns: There are several sorting and column width options. The first sort option is to select a column, this will auto sort with an arrow displayed. When the arrow is pointing up it sorts the data in ascending order. When the arrow is pointing down it sorts the data in descending order. Selecting the column again will remove the arrow. Selecting the hamburger icon is another way to further perform column setup. The following sorting and column width options are available: |
| o | Pin Column: Allows the column to be moved to the far right or left of the grid. The following options are available: |
| ▪ | Pin Left: Pins the column to the far left of the grid, displaying in the first column. |
| ▪ | Pin Right: Pins the column to the far right of the grid, displaying in the last column. |
| ▪ | No Pin: Removes the selected pin and places the column back in its original location. |
| o | Autosize This Column: Allows the selected column to autosize the width of the information displaying. |
| o | Autosize All Columns: Allows all columns to autosize the width of the information displaying. |
| o | Group by: Allows the columns to be sorted by whichever column is selected. For example, if Visit # is selected, then Group by will display as Group By Visit #. It will sort the columns by the account number adding a plus sign icon to the first column, that when selected, will expand a listing of notes associated with the selected account number. Selecting the minus sign icon will close the listing. |
| o | Reset Columns: Allows the TruBridge EHR default setting of the columns to be reapplied. |
| o | Tool Panel: Allows the column Tool Panel to display on the right hand side of the Note List screen for easy access to edit the grid display. To re-hide the tool panel, select any column and reselect Tool Panel. The following options are available within the Tool Panel: |
| ▪ | Show/Hide Columns: See Show Hide Columns above for more information. |
| ▪ | Row Groups: Allows the rows to be grouped by the column that is dragged to the Row Group area. For example, dragging Entered By to the Row Group area will sort the rows into single rows of each user has entered a note on the patient's profile. See Group by above for more information. |
| ▪ | Values: Currently TruBridge Use Only. |
| • | Search the Columns: Select the hamburger icon and then select the |
| o | Alphabetical/Numerical Columns: |
| ▪ | Equals |
| ▪ | Not Equal |
| ▪ | Starts With |
| ▪ | Ends With |
| ▪ | Contains |
| ▪ | Not Contains |
| o | Date/Time Columns |
| ▪ | Equals |
| ▪ | Greater Than |
| ▪ | Less Than |
| ▪ | Note Equal |
| ▪ | In Range |
NOTE: All changes made to the Note List grid will save automatically to the users UBL.
If a note has a ![]() plus sign icon in the first column, select it to see the Note History. Select the
plus sign icon in the first column, select it to see the Note History. Select the ![]() negative sign icon to close the note history. An OUT OF DATE watermark will display in the background of the notes listed within the Note History.
negative sign icon to close the note history. An OUT OF DATE watermark will display in the background of the notes listed within the Note History.
A note that is currently being edited or newly created within the last 24 hours will display with a yellow highlight.
Selecting the double sided arrow in the top right hand corner of the the Note List panel will display the Note List panel full screen. Selecting it again will re-collapse it within the 3 panel view.
Select Web Client > Charts > Patient > Notes > Note List
Note List